
Auto Notch Slot button
The Notch Slot auto option allows you to define a notch measurement. A notch is a three-sided, square slot. This measurement type is particularly useful when you do not want to measure a series of lines and construct intersections and midpoints from them. Notches must be measured with four hits.
To access the Notch Slot option, access the Auto Feature dialog box for a Notch Slot (Insert | Feature | Auto | Notch).
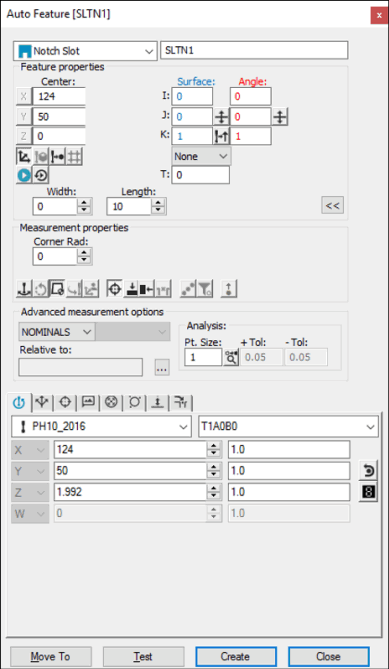
Auto Feature dialog box - Notch Slot
With the dialog box open, use one of these methods to create the feature.
Using Surface Data on the Screen
To generate a notch measurement using surface data:
From the Graphic Modes
toolbar, click the Surface Mode icon ( ).
).
Using the animated probe, take five hits on the CAD surface in the same order as if using a CMM (see "Using Surface Data with the CMM").
Make any other modifications to the dialog box and the Probe Toolbox as needed.
Click Create.
Using Surface Data with the CMM
You should select the Find Noms option in the Mode list for this measurement method. For more information on nominals, see the "Mode List" topic in the PC-DMIS Core documentation.
To generate a notch measurement using surface data with the CMM:
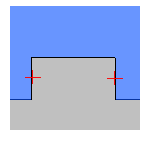
Touch two times on the side opposite the opening of the notch using the probe. This defines a line along the edge.
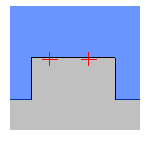
Touch the part once on one parallel side of the notch and once on the other parallel side. This defines the length. The point is along the edge line, midway between the parallel sides.
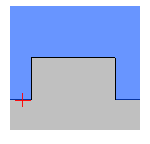
Take one hit on the open edge. This defines the width of the notch.
Make any other modifications to the dialog box and the Probe Toolbox as needed.
Click Create.
Using Wireframe Data on the Screen
Wireframe CAD data can also be used to generate a notch.
Using the animated probe:
Touch twice on the side opposite the opening of the notch using the probe. This defines a line along the edge.
Touch the part on one parallel side of the notch and then on the other parallel side. This defines the length. The point is along the edge line, midway between the parallel sides.
Take a single touch on the open edge. This defines the width of the notch.
Make any other modifications to the dialog box and the Probe Toolbox as needed.
Click Create.
Using Wireframe Data with the CMM
You should select the Find Noms option in the Mode list for this measurement method. For more information on nominals, see the "Mode List" topic in the PC-DMIS Core documentation.
To generate a notch measurement using wireframe data with the CMM :
Touch twice on the side opposite the opening of the notch using the probe. This defines a line along the edge.
Touch the part on one parallel side of the notch and then on the other parallel side. This defines the length. The point is along the edge line, midway between the parallel sides.
Take a single touch on the open edge. This defines the width of the notch.
Make any other modifications to the dialog box and the Probe Toolbox as needed.
Click Create.
Without Using CAD Data
To generate a notch without the use of CAD data:
Find the top surface using three hits.
Touch twice on the side opposite the opening of the notch using the probe. This will define a line along the edge.
Touch the part on one parallel side of the notch and then on the other parallel side. This defines the length. The point is along the edge line, midway between the parallel sides.
Take a single touch on the open edge. This defines the width of the notch.
Make any other modifications to the dialog box and the Probe Toolbox as needed.
Click Create.
Typing the Data
This method allows you to type the desired X, Y, Z, I, J, K values for the notch slot.
Type the desired X, Y, Z, I, J, K values for the feature into the dialog box.
Click Create to insert the feature into your measurement routine.