Auto Polygon button
The Polygon auto option lets
you define and insert a  Polygon
auto feature into your measurement routine. A polygon
is any feature composed of three or more sides of equal length.
Polygon
auto feature into your measurement routine. A polygon
is any feature composed of three or more sides of equal length.
Hexagon and octagon shapes are both polygon features.
This auto feature is primarily used to measure nuts and bolts.
To define and insert a polygon option, open the Auto Feature dialog box for a polygon (Insert | Feature | Auto | Polygon).

Auto Feature dialog box - Polygon
With the dialog box open, use one of these methods to create the feature.
Using the CAD Model
Access the Polygon auto feature dialog box (Insert | Feature | Auto | Polygon).
In the Number of Sides box, define the number of sides that your polygon feature has.
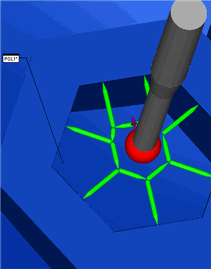
Click once on the desired polygon feature in
the Graphic Display window. PC-DMIS fills in the center point information
for the polygon and draws some preliminary
path lines. As you make changes to the dialog
box, notice that PC-DMIS dynamically updates to path to reflect the
changes.
CAD tolerances can affect the found polygon. For more information, see the "Changing CAD Tolerances" topic in the Core documentation.
In the Number of Hits box, define how many hits you want PC-DMIS to take when measuring each side. PC-DMIS always takes at least two hits on the very first side of the feature to determine the feature's angle vector.
In the Orientation area, determine whether it's an inner polygon or an outer polygon by selecting Hole or Stud, respectively.
In the Corn. Rad. box, define a corner radius. This determines how far away from the corners PC-DMIS should take hits on the polygon sides. This helps avoid taking hits directly in the corners.
In the Diameter box, ensure that you have a correct diameter for the polygon. For common, even-sided polygons, the diameter is the distance between two opposing sides. For other polygons, such as an equilateral triangle, it is twice the radius of the largest circle you can inscribe inside the polygon. PC-DMIS automatically fills in this value when you click on the polygon.
Make any other modifications to the dialog box and the Probe Toolbox as needed.
Click Create. PC-DMIS inserts the Polygon auto feature into your measurement routine.
Using the CMM
You can "learn" an Auto Polygon's position without using any CAD data by taking hits on the part with your machine's probe. Fill out the dialog box with the necessary information. With the Polygon Auto Feature dialog box remaining open, take a hit on one of the polygon's sides. After the first hit, the Status Bar at the bottom of your screen provides you with additional instructions. Follow the prompts given in the Status Bar to complete the polygon creation. Click Create when finished.
Typing the Data
If you know the theoretical data for the polygon, you can also create a polygon auto feature by typing its theoretical data in the appropriate fields. Use the Polygon auto feature dialog box to specify the XYZ center and IJK vector information. Define the number of sides, the number of hits per side, the diameter, and the corner radius. Click Create when finished.