Contact Find Hole Properties tab for a Circle feature
The Contact Find Hole Properties tab becomes visible when the Auto Feature dialog box is open and a contact probe is enabled. The items become available for selection when PC-DMIS is in DCC mode. This tab contains items that you can use to change the "find hole" properties for auto features that use contact probes.
Once you select an item in the Find hole list (NOCENTER, SINGLE HIT, or CENTER) and execute your measurement routine, PC-DMIS positions the probe a prehit distance above the theoretical center of the feature. It then drives normal to the feature surface vector searching for the hole at touch speed. The search continues until either the surface is touched (indicating that the hole is not there), or the "find hole" distance is reached (indicating that the hole is present). For more information and examples, see "Calculating the 'Find Hole' Distance".
If the "find hole" operation fails, PC-DMIS displays the Read position dialog box. This gives you these choices:
Yes - This gives you the choice to either read a new position from which to continue searching for the hole. You can then use your jog box to move the probe to the new location.
No - This gives you the choice to skip this feature and move on to the next feature. PC-DMIS moves the probe away from the hole by the distance specified for an avoidance move (see "Working with Contact Auto Move Properties") and continues running the measurement routine. This movement helps to prevent a possible probe collision.
Additionally, you can set PC-DMIS to automatically continue to execute the measurement routine when the hole cannot be found. For details, see "Auto Continue Execution if FindHole Fails" in the "Setting Your Preferences" chapter of the PC-DMIS Core documentation.
Depending on the type of feature in the Auto Feature dialog box, this tab may change to contain one or more of the following items:
This item supports these auto features:
Circle
Round Slot
Square Slot
Notch Slot
Polygon
Cylinder
It contains the following options, which determine how PC-DMIS proceeds when it attempts to find a hole. If an option is not available, it is not supported for that feature type.
Option |
Description |
DISABLED |
No "find hole" operation is performed. |
NOCENTER |
This item acts as the CENTER item, except that the probe does not take the three hits to find the rough estimate of the hole's center. It merely begins measuring the circle using the existing parameters set in the specific Auto Feature dialog box. |
SINGLE HIT |
This setting tells the probe to take one single hit. If it hits the surface and does not find the hole, then it automatically switches to the "If the hole is never found" case (for circles and slots) or "If the hole is not found" case (for notches) described in the Find Hole specifics links. If the probe finds the hole, it uses the NOCENTER option to proceed. |
CENTER |
This item first causes the probe to move down to the "find hole" distance to make sure it does not encounter any material. It then moves to either the feature's depth or to the "check" distance to search inside the hole for a rough estimate of the hole's center (see the note below). The probe does this by taking three hits equally spaced around the hole. Once the probe has the hole's general location, it then proceeds to measure the hole using the parameters set in the specific Auto Feature dialog box. Unless you select NOCENTER or SINGLE HIT, this is the default procedure that PC-DMIS follows if it finds the hole. |
The registry entry
in this note gives you greater control over the depth of the centering
process for the "find hole" operation. By default, the centering
process’s Z component is determined by the feature’s depth. This is often
used in conjunction with an Rmeas (plane) feature. However, sometimes
when you do not use an Rmeas feature, and the surface of the part varies
greatly in Z, the centering process never finds the hole, because the
part’s surface lies below the search depth.
In this case, you can instead have the "find hole" centering
process execute at the Check Distance * Percent,
by setting the FHCenteringAtChkDistTimesPercentInsteadOfDepth
registry entry to TRUE in the PC-DMIS
Settings Editor documentation. This entry is located in the USER_AutoFeatures
section. For information about the Check distance
and Check percent values, see "Parameter Settings: Motion
tab".
Circle or Cylinder
The following table describes the "find hole" specifics for a Circle or Cylinder.
If the hole is found |
PC-DMIS moves down to the "check" distance and proceeds to take three hits equally spaced around the hole to determine the general location of the hole. Following this general adjustment, PC-DMIS then measures the hole using the parameters that are defined on the feature's tab. This includes sample hits, and so on. This is the same as the CENTER item described above. |
If the hole is not found |
PC-DMIS backs away from the surface and starts a circular search pattern that is (feature radius – probe radius) out from the theoretical feature center. The search will try (2 * PI * feature radius/(feature radius – probe radius)) locations around the search circle. If the hole is still not found, the search radius increases by (feature radius – probe radius) and continues until the search radius is equal to the prehit distance. If the prehit is smaller than (feature radius – probe radius), only one search pattern is completed. |
If the hole is never found |
PC-DMIS moves the probe to a position of a prehit above the final point of the searching cycle and prompts you to do a "Read Position". (See "Read position Item".) |
Adjustments along the surface normal |
As PC-DMIS searches and finds a surface instead of the hole, it continually updates the search height based on the found surfaces. Once the hole is found, it updates the depth of measurement of the hole based on the last surface found. If the hole is found the first time, no adjustments are made. |
Adjustments with RMEAS |
If you supply an RMEAS feature (or features), PC-DMIS assumes that you want to use the feature(s) as the reference for both the search height and the depth of the hole measurement. Therefore, there is no adjustment along the surface normal other than the RMEAS adjustment. |
Square Slot or Round Slot
The following table describes the "find hole" specifics for a Square Slot or Round Slot.
If the hole is found |
PC-DMIS moves down to the "check" distance and measures one hit on each of four the sides of the slot. It adjusts for the center of the four hits. It measures two hits on one of the long sides to adjust for the slot rotation. After it calculates a general location and orientation of the slot, it uses the parameters that you define on the tab for the feature to measure the slot. |
If the hole is not found |
PC-DMIS backs away from the surface and starts a circular search pattern that is (feature radius – probe radius) out from the theoretical feature center. The search will try (2 * PI * feature radius/(feature radius – probe radius)) locations around the search circle. If the hole is still not found, the search radius increases by (feature radius – probe radius) and continues until the search radius is equal to the prehit distance. If the prehit is smaller than (feature radius – probe radius), only one search pattern is completed. |
If the hole is never found |
PC-DMIS moves the probe to a position of a prehit above the final point of the searching cycle. It prompts you to do a "Read Position". (See "Read position Item".) |
Adjustments along the surface normal |
As PC-DMIS searches and finds a surface instead of the hole, it continually updates the search height based on the found surfaces. Once it finds the hole, it updates the depth of measurement of the hole based on the last surface found. If it finds the hole the first time, no adjustments are made. |
Adjustments with RMEAS |
If you supply an RMEAS feature (or features), PC-DMIS assumes you desire to use the feature (or features) as the reference for both the search height and the depth of the hole measurement. Therefore, there is no adjustment along the surface normal other than the RMEAS adjustment. |
Notch Slot
The following table describes the "find hole" specifics for a Notch Slot.
If the hole is found |
PC-DMIS moves down to the "check" distance to measure the hole's depth and then to measure the hole. |
If the hole is not found |
PC-DMIS backs away from the surface and starts a search pattern. The pattern is circular and is adjusted out one-half the width from the theoretical feature center (which, for notches, is the center of the inside edge). The search tries eight locations around that location. If it finds the hole, the probe moves to the depth to measure the hole's depth and then to measure the hole. |
If the hole is never found |
PC-DMIS moves the probe to a position of a prehit above the final point of the searching cycle. It prompts you to do a "Read Position". (See "Read position Item".) |
Supported Interfaces
All of the DCC interfaces support the "find hole" functionality. If you experience a problem with a specific interface, contact Hexagon Technical Support.
The On hit error item supports these auto features: Edge Point, Angle Point, Corner Point, Circle, Ellipse, Round Slot, Square Slot, Notch Slot, Polygon, Cylinder, and Cone. It allows improved error checking when PC-DMIS detects an unexpected or missed hit. If you select this check box, PC-DMIS does the following:
Automatically takes a read position whenever an unexpected probe hit or a missed probe hit takes place during the measurement cycle.
Measures the entire feature with the new location obtained from the read position.
The Edit window command line for this option would read:
ONERROR = TOG
TOG: This toggle field switches between YES (on) and NO (off).
For additional information on what options you have when PC-DMIS detects unexpected or missed hits, see the "Branching on an Error" topic in the "Branching by Using Flow Control" chapter of the PC-DMIS Core documentation.
By default, when PC-DMIS performs a read position operation (such as used in Read Pos, Find Hole, or On Error), it returns only the X and Y values. However, two registry entries give you further control over returning the Z axis value as well. These are: ReadPosUpdatesXYZ and ReadPosUpdatesXYZEvenIfRMeas. If these registry entries are set to FALSE, the location found by the read position is snapped to the feature's normal vector and stored as the target. However, since Edge Point, Angle Point, and Corner Point features do not have a normal vector, but are instead defined by a combination of vectors, for these feature types PC-DMIS does not snap the read position location to a feature vector as it did in versions prior to v43. Instead, PC-DMIS ignores the above registry entries and assigns the target (TARG field) the XYZ of the read position.
Supported interfaces: All of the DCC interfaces support the On hit error functionality. If you experience a problem with a specific interface, contact Hexagon Technical Support to investigate the issue.
The Read position item supports these auto features: Circle, Ellipse, Round Slot, Square Slot, Notch Slot, Polygon, Cylinder, and Cone. If you select this check box, PC-DMIS pauses execution above the surface of the feature and displays the following message during execution time: "Read new probe position?". Do one of the following:
If you want PC-DMIS to use the current target position to measure the feature, click No.
If you want PC-DMIS to use the current tip position as the target value for measuring the feature, move the tip to the desired position and then click Yes. You will receive this message: "Do you wish to save this position as the new target?" Do one of the following:
If you want PC-DMIS to use the current target position for only the current execution, click No. PC-DMIS does not save this position for the next execution.
If you want PC-DMIS to use the current target position for the current execution and also save this position for the next execution that it takes, click Yes.
If you click Yes, PC-DMIS requires you to place the probe in a zone close to the center of the feature. The depth and orientation of the measurement are then automatically determined by one of the options in the following table.
Option |
Description |
RMEAS feature |
If you provide an RMEAS feature, PC-DMIS assumes you want to measure the hole with respect to that feature (or features). Therefore, the feature (or features) is used to define the surface normal and depth of measurement, while the Read Pos is used to determine the other two axes of translation. If the search feature fails, the message "Read new probe position?" displays. In this case, click No to continue with the next feature. |
Find Hole |
If the "find hole" operation is used and the surface around the hole is touched at least one time, then PC-DMIS adjusts all three axes. Two of the axes are based on the location of the probe once it has found the hole. The third axis, along the surface normal, is based on the last surface touched. The "find hole" operation does not override an RMEAS feature. |
Sample Hits |
If sample hits are used, they are always the top priority on determining both the orientation and depth of the measurement of the hole. |
None of the above |
If none of the above options are used, PC-DMIS probes the hole based on the provided target and depth values, adjusted by the probe placement within the cylindrical zone. |
By default, when PC-DMIS performs a read position operation (such as used with the Read position check box, Find hole list, or On hit error check box), it returns only the X and Y values. However, two registry entries give you further control over returning the Z axis value as well. These are ReadPosUpdatesXYZ and ReadPosUpdatesXYZEvenIfRMeas.
Turning Off Find Hole's Default Last Hit Adjustment
When the probe registers a hit during a "find hole" operation, its ruby tip usually contacts with the surface (meaning it has not yet found the hole), and the Z value for the next search hit is then adjusted with the Z value of the last hit. This normal behavior is usually what you want, but in some cases, you may want to turn off this adjustment. You can do this by setting the AdjustFindHoleByLastHit registry entry to FALSE in the PC-DMIS Settings Editor.
If your wrist cannot move to a tip angle matching your feature's vector, your probe's stem may contact with the hole's edge during the "find hole" operation, resulting in a registered hit that PC-DMIS assumes is the part's surface at the ruby tip's location. By default, PC-DMIS attempts to adjust the Z value of the next search hit by the last value, resulting in a bad move. If you turn off this default last hit adjustment, then in a case like this, PC-DMIS continues searching without adjusting the Z value.
Sequence of Events |
Figure and Description |
|
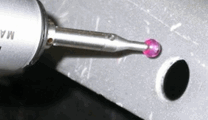
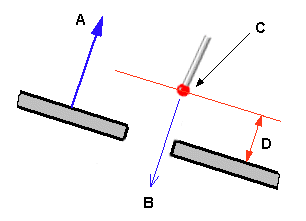
Frame 1 The tip angle does not match the hole's vector. |
|
A - U,V,W |
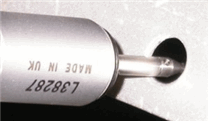
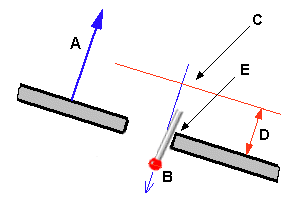
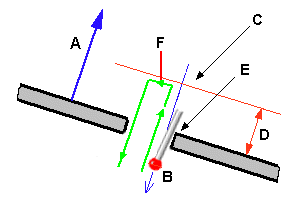
Frame 2 This results in the stem of the probe contacting the edge of the part at E and registering a hit at B. |
|
A - U,V,W |
Frame 3 (Default behavior) By default, PC-DMIS adjusts the Z value for the next search hit, but in this case, this results in a bad move at F. |
This occurs if the AdjustFindHoleByLastHit registry entry set to True. |
A - U,V,W |
Frame 3 (Modified Behavior) However, if you turn off the default adjustment, PC-DMIS continues searching for the hole using a correct move at F. |
This occurs if the AdjustFindHoleByLastHit registry entry set to False. |
A - U,V,W |