
The Certify command (File | Operations | Certify) lets you certify measurement routines and add comments related to them.
A certified measurement routine is a routine that has been validated by a Programmer (member in the Protect-Programmer group). This routine meets internal requirements to use in production. The Protect application lets you control and track modifications to this measurement routine, such as:
Any internal organizational requirements
Specific externally-imposed process certification requirements (such as ISO and FDA)
The Protect Viewer installer (included with PC-DMIS installer) creates the Protect-Programmer group in the Local Users and Groups folder on your computer. This group's users can certify and edit certified measurement routines.
If you are not a member of the Protect-Programmer group, you can open, view, and execute certified routines in Protected Mode. However, you cannot certify routines nor edit certified measurement routines.
To make any changes in the Protect-Programmer group (such as add or delete the username), contact your computer's administrator.
Adding a User or a Group to the Protect-Programmer Group
To add a user or a group into the Protect-Programmer
group, follow these steps:
Prerequisites:
Protect LMS License
Administrator access to the computer
Install the Protect Viewer installer (included with the PC-DMIS installer). This creates the Protect-Programmer group in the Local Users and Groups folder on your computer.
To open the Edit local users and groups dialog box, follow either of these two ways:
Type local in the search box on the taskbar, and choose Edit local users and groups from the results.
Press Windows + R. In the Run dialog box, type lusrmgr.msc, and click OK.
From the left pane, click Groups. This displays the list of groups on your computer and contains the Protect-Programmer group.
Local Users and Groups screen with the Protect-Programmer group
Double-click Protect-Programmer to open the Protect-Programmer Properties dialog box.

Protect-Programmer Properties dialog box
From the Protect-Programmer Properties dialog box, click Add to open the Select Users, Computers, Service Accounts, or Groups dialog box.

From the Select Users, Computers, Service Accounts, or Groups dialog box, click Locations to open the Locations dialog box. You can connect the account as a network user or a local user.

To connect the account as a network user, from the Locations dialog box, select the network location. Click OK to close the Locations dialog box.
To connect the account as a local user, from the Locations dialog box, select the computer name. Click OK to close the Locations dialog box.
From the Select Users, Computers, Service Accounts, or Groups dialog box, in the Enter the object names to select box, type your user name, and click Check Names. If you are connected to a network, the box displays an entry that displays your network's name.
You can also add a local group or network group into the Protect-Programmer group. This adds all the members in that local or network group into the Protect-Programmer group.
Click OK to close the Select Users, Computers, Service Accounts, or Groups dialog box. In the Protect-Programmer Properties dialog box, the Members area display the user name or group that you added in step 6.
Click OK to close the Protect-Programmer Properties dialog box.
You have successfully added the user or group into the Protect-Programmer group.
The Certify command is available if you belong to the Protect-Programmer group, and you have the Protect LMS license enabled.
Certify Routine dialog box
The Certify command (File | Operations | Certify) opens the Certify Routine dialog box.

Certify Routine dialog box
User - This box displays your user name on the network.
Comments - This box lets you type any related comments before you certify a measurement routine.
Certify - This button certifies and saves the measurement routine, closes the dialog box, and generates a .protect file. The name of the file is <measurement routine file name>.PRG.protect, where <measurement routine file name> is the measurement routine's file name. The software generates the .protect file in the same folder as the measurement routine. The default folder location is:
C:\Users\Public\Documents\Hexagon\PC-DMIS\<version>
Where <version> is the PC-DMIS version.
Cancel - This button ignores any changes and closes the dialog box.
Once you create the .protect file, anyone who belongs to the Protect-Programmer group sees this Save dialog box when they save their changes to the measurement routine:
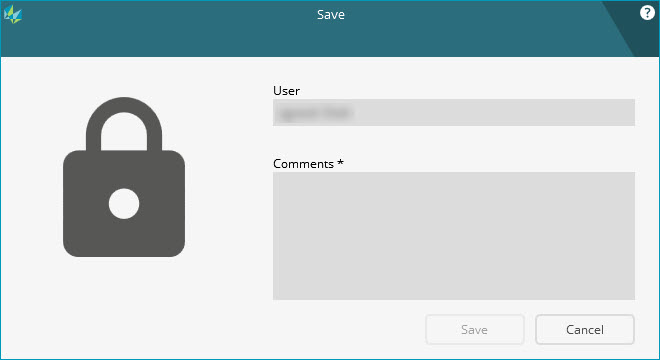
Save dialog box
The Save dialog box is similar to the Certify Routine dialog box. The only difference is that the Save dialog box contains the Save button instead of the Certify and Cancel buttons.
The Save button saves the comments along with all the changes made in the measurement routine in the .protect file.
When you open a certified measurement routine in PC-DMIS 2018 R2 and earlier, the certification is not available. The measurement routine opens like a usual measurement routine.
Procedure to certify and view the .protect file
The procedure below certifies a measurement routine and creates a .protect file. The Protect Viewer application lets you see the .protect file. For information on the Protect Viewer application, see the Protect Viewer Help file.
To certify and view the .protect file, follow these steps:
Prerequisites
To certify a measurement routine, you must be a member of the Protect-Programmer group and have the Protect Viewer LMS license enabled.
To view the .protect file, you must have the "Protect Viewer" application installed on your computer.
Create a measurement routine.
Certify a measurement routine. To do this,
click File | Operations | Certify, or from
the File Operations toolbar (View
| Toolbars | File Operations), click Certify
( ). The software
opens the Certify Routine dialog box.
). The software
opens the Certify Routine dialog box.
From the Certify Routine dialog box, in the Comments box, type your comments, and click Certify. This step saves and certifies the measurement routine and generates the .protect file.
Locate the new .protect file. It has the same name as your measurement routine's file name with a .protect extension.
If the measurement routine file name is ABC.PRG, then the .protect file name is ABC.PRG.protect.
Double-click the .protect file, or right-click it, and select Open to open the file in Protect Viewer application. For information on Protect Viewer, see the Protect Viewer application.
To edit certified measurement routines, users must be in the Protect-Programmer group.
For all other user types, PC-DMIS opens the certified measurement routine in Protected Mode. When in Protected Mode, you can only execute measurement routines. You cannot disable Protected Mode. For information on Protected Mode, see "Effects of Protected Mode" and "Visual Indicators".