
Settings toolbar
The Settings toolbar (View | Toolbars | Settings) contains lists that provide a more convenient way to switch between the some settings. From left to right on the toolbar, these settings are:

 Views
- Saved views of the Graphic Display window
With the Views list, you can recall a stored viewset that was created and saved with the active measurement routine.
PC-DMIS inserts a RECALL/VIEWSET command into the Edit window.
Command line in the
Edit window:
RECALL/VIEWSET, view_set_name
View_set_name = the name of the view set to recall.
While PC-DMIS is recalling a view, all other functions are temporarily inaccessible.
For information on viewsets, see "Setting Up the Screen View" in the "Editing the CAD Display" chapter, and "Working with Viewsets" in the "Inserting Report Commands" chapter.

 Alignments
- Saved alignments
With the Alignments list, you can select a previously saved alignments. These alignments can then be inserted into the Edit window when selected.
See "Saving an Alignment" from the "Creating and Using Alignments" chapter for additional information on how to create and save alignments.
You can control which alignments are displayed in this list by going to the Alignment in the Edit window and changing the value for the LIST= portion of the ALIGNMENT/START command (for more information, see the "Creating and Using Alignments" chapter).

 Probes
- Defined probe types
With the Probes list, you can select probes already defined in your probe file. PC-DMIS inserts a LOADPROBE command into the Edit window.
PC-DMIS marks the currently active TProbe in the Probes List of the Settings Toolbar in a bold font weight. If you select a different probe from the list that isn't the physically active TProbe and then take a hit, it displays a warning message. We recommended that you always use the probe settings of the physically active probe, otherwise your hit data might not be properly corrected for the ball diameter and offset.

 Probe
Tips - Defined probe tips and probe tip angles
The Probe Tips list stores previously defined probe tip angles. See "Add Angles" from the "Defining Hardware" chapter for information on how to create tip angles.

 Workplane
- Available workplanes
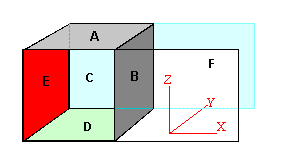
The Workplane list allows you to change the plane in which you are working. This option does not change the view in the Graphic Display window; it changes only the workplane.
The available workplanes are:

Face |
Color |
Workplane |
A=TOP |
Light Gray |
ZPLUS |
B=RIGHT |
Dark Gray |
XPLUS |
C=BACK |
Light Blue |
YPLUS |
D=BOTTOM |
Light Green |
ZMINUS |
E=LEFT |
Red |
XMINUS |
F=FRONT |
Clear |
YMINUS |
Measured Lines and Workplanes
When creating a measured line, PC-DMIS expects the hits for the line to be taken at a vector perpendicular to the current workplane.
For example, if your current workplane is ZPLUS (with a vector 0,0,1), and you have a block-like part, the hits for the measured line must be on a vertical wall of that part, such as the front or side.
If you then wanted to measure a line feature on the top surface of the part, you would need to switch the workplane to XPLUS, XMINUS, YPLUS, or YMINUS, depending on the direction of the line.
See the "Measuring a Line" topic for information on creating measured lines.

 Projection
Planes - Planes (faces) to which to project certain
features
The Projection Planes list contains a list of any plane features you have created in your measurement routine. By default PC-DMIS projects each measured line and circle into your current workplane, so the default item on this list shows Workplane. However, you can select a different plane from this list. PC-DMIS will then project each measured line and circle into the newly selected plane.
Contact the Documentation Team
PC-DMIS 2019 R1
Copyright © 2019 Hexagon Manufacturing Intelligence – Metrology Software, Inc.
Help System last generated on 23 January 2019