The calibration process for the Renishaw FCR25 Probe Changer represents the steps that you would take to prepare to use any of the probe changers that PC-DMIS supports. The process discussed here is specific to the FCR25 Probe Changer.
Two inserts are used with the FCR25 rack to accommodate different probe types: PA25-SH and PA25-20.
PA25-SH and PA25-20 Inserts
For example, the following image of an FCR25 Probe Changer shows three ports: two with inserts and one without (probes are also shown). The left port shows a PA25-SH insert, and the right port shows a PA25-20 insert. The middle port does not have an insert.
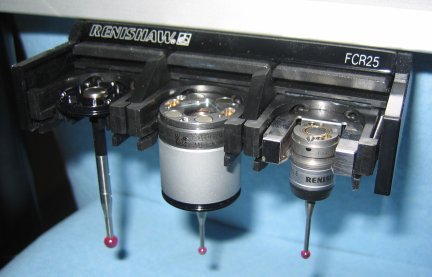
FCR25 Probe Changer inserts and probe types
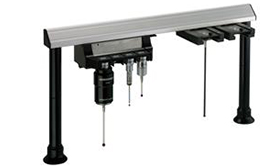
The FCR25 Probe Changer must be mounted on the machine
table parallel to either the X or Y axis for successful calibration. The
FCR25 Probe Changer can be mounted to your table with the MRS rack or
the three and six port stand-alone racks. 
 For mounting instructions, consult the documentation that came with your
probe changer.
For mounting instructions, consult the documentation that came with your
probe changer.
To calibrate your probe changer:
Step 1 - Select the FCR25 Probe Changer
Step 2 - Define the Mount Point
Step 4 - Prepare the Probe Changer
Step 6 - Measure Port 1 / PA25-SH Insert
Step 7 - Measure Port 3 / PA25-20 Insert