You can construct a Tertiary Datum Point from a plane, line, or set of points. The set of points can be multiple selected points, a constructed set of points, or a scan feature contains multiple points.
The tertiary datum construction uses the points within the input feature (or features), as well as with the specified primary and secondary datums to create an "orientation constrained" and "external to material" point. You can use this point in alignments to simulate a tertiary datum.
"Orientation constrained" means that the resulting point feature is solved with a nominal orientation, with respect to the specified primary and secondary datum.
"External to material" means that the resulting point feature lies on the highest point on the input feature (or features), subject to the orientation constraint.
PC-DMIS constructs the tertiary datum point at the highest point along a vector that is oriented perpendicular to the specified primary datum, and at the keyed-in angle from the specified secondary datum. PC-DMIS places the point on the secondary datum line in the primary datum plane to simplify use in the alignment command.
Examples
The examples below showcase two different angles, the first is orthogonal and the second non-orthogonal:
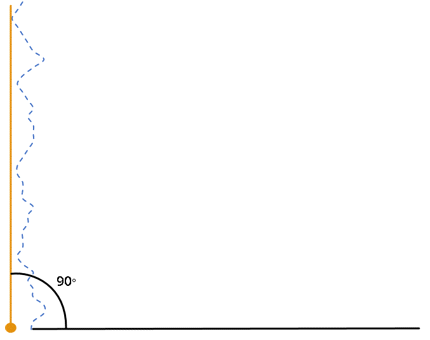
Case 1 - 90 Degrees (Orthogonal)
The yellow tertiary datum point below is constructed from the highest input point (where the yellow line contacts the blue dotted line) that is relative to the basic angle (90 degrees) from the specified secondary datum line in the primary datum plane's workplane.
Constructed Tertiary Datum Point feature from a 90-degree basic angle
Case 2 - 70 Degrees (Non-Orthogonal)
Similar to Case 1, the yellow tertiary datum point is again constructed from the highest input point relative to the specified datums. This example shows how a non-orthogonal tertiary datum is created.
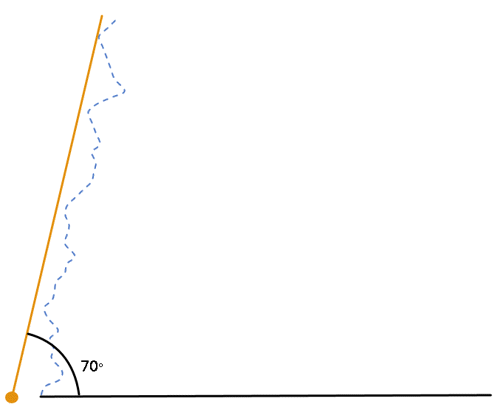
Constructed Tertiary Datum Point feature from a 70-degree basic angle
How to Construct a Tertiary Datum Point
Access the Construct Point dialog box (Insert | Feature | Constructed | Point).
From drop-down list that has Auto selected, select Tertiary Datum.
From the list of features, select the input feature (or features). For valid input feature types, see the table in the "Constructing a Point Feature" topic above. The selected features determine the initial Secondary-tertiary basic angle value.
From the Primary datum area, from the drop-down list, select the primary datum. The feature must either be a plane or workplane relative to the alignment.
From the Secondary datum area, from the drop-down list, select the secondary datum. The feature must be a line.
If you need a different basic angle, type it in the Secondary-tertiary basic angle box.
From the Compensation type area, from the second drop-down list, select a probe compensation option (BF for best fit or BFRE for best fit recompensate).
Click the Create button to insert the constructed point feature into your measurement routine.
The Edit window command line for this option is:
CONSTR/POINT,TERTIARY_DATUM,feat_1,feat_2, …
MATH_TYPE/BFRE
PRIMARY DATUM PLANE/FEATURE,PLN1
SECONDARY DATUM PLANE/FEATURE,LIN1
SECONDARY TERTIARY BASIC ANGLE/<angle>
<angle> = This is the basic angle between secondary and tertiary datums.