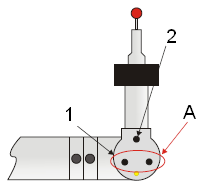
The two modes for a two-button configuration are discussed below:
Measure Mode

The following Measure Mode functions are available for the buttons indicated above:
1:DONE - Press < 1 second.
1:ERASE last hit - Hold > 1 second.
1:OPEN DRO - Hold > 1 second when there is no hit in the buffer.
1:TOGGLE DRO - Hold > 1 second when the DRO is already open. XYZ <-> XYZT. The "T" value is displayed.
2:HIT POINT - Press < 1 second.
2:PULLED HIT -Press, pull back, release with 1 second. See "Using Pulled Hits for Probe Compensation"
2: SCAN - Press, hold > 1 second, drag.
A: Buttons indicated by a circle with a red arrow perform the same function.
Mouse Mode

The following Mouse Mode functions are available for the buttons indicated above:
1: Mouse RIGHT Button - Used for popup menus.
1:PAN - Press and hold on the CAD model.
2: Mouse LEFT Button - Used for screen selections.
A: Buttons indicated by a circle with a red arrow perform the same function.
Switching Between Mouse Mode and Measure Mode
To switch to Mouse Mode: Press and hold the take hit button and then quickly press the done button (within the first second).
To switch to Measure Mode: Move the cursor to the top of the screen and press the middle button (left mouse button).
To toggle from either mode:

Turn the "F" axis to the limit, then
Turn the "E" axis 90 degrees.