
Patch Scan dialog box
The Patch scan is like a series of Linear Open scans that are done parallel to each other.
The Insert | Scan | Patch method scans the surface according to the selected techniques in the Direction 1 Tech area and Direction 2 Tech area.
The probe will always remain within the cut plane while doing the scan.
The Direction 1 technique indicates the direction between the first and second boundary points.
The Direction 2 technique indicates the direction between the second and third boundary points.
PC-DMIS will scan the part on the surface indicated in the Direction 1 Tech area. When it encounters the second boundary point, PC-DMIS will automatically move to the next row as indicated in the Direction 2 Tech area.
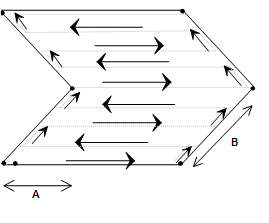
A
- Direction 1 technique
B - Direction 2 technique

A Sample Patch Scan
To Create a Patch Scan
Ensure that you have a TTP or an analog probe enabled.
Place PC-DMIS into DCC mode.
Select Insert | Scan | Patch from the submenu. The Patch Scan dialog box appears.
If you want to use a custom name, type the name of the scan in the ID box.
Select the appropriate PATCH type for the first direction from the Direction 1 Tech list. Depending on the technique selected, type the appropriate increment and angle values into the Max Incr, Min Incr, Max Angle, and Min Angle boxes.
If you select the technique BODY for the first direction, you must also select it for the second direction.
Select the appropriate PATCH type for the second direction from the Direction 2 Tech list. Depending on the technique selected, type the appropriate increment and values into the available Max Incr, Min Incr, Max Angle, and Min Angle boxes.
If your scan crosses multiple surfaces, consider selecting surfaces by using the Select check box as discussed in the "Graphics Tab" topic.
Add the 1 point (starting point), the D point (the direction to begin scanning), the 2 point (the end point of the first line), the 3 point (to generate a minimum area), and, if desired, the 4 point (to form a square or rectangular area). This selects an area that you wish to scan. Pick these points by following an appropriate procedure as discussed in the "Boundary Points area" topic.
Make any needed changes to the vectors in the Initial Vectors area. To do this, double-click on the vector, make any changes to the Edit Scan Item dialog box, and then click OK to return to the Path Scan dialog box.
Select the appropriate nominals mode from the Nominals list in the Nominals Method area.
In the Tolerance box in the Nominals Method area, type a tolerance value that at least compensates for the probe's radius.
Select the appropriate execution mode from the Execute list in the Exec Control area.
If you are using a thin part, type the part's thickness in the Thickness box on the Graphics tab.
If needed, select any of the check boxes from the areas on the Execution tab.
If you are using an analog probe, consider using the Control Points tab to run your scan optimally.
Click the Generate button in the Theoretical Path area on the Path Definitions tab to generate a preview of the scan on the CAD model in the Graphic Display window. When you generate the scan, PC-DMIS will start the scan at the start point and will follow the chosen direction until it reaches the boundary point. The scan then moves back and forth scanning in rows along the chosen area, scanning in rows at the specified increment value until it finishes the process.
If needed, you can delete individual points. To do this, select them one at a time from the Theoretical Path area and press the Delete key.
Make additional modifications to your scan as needed.
Click the Create button. PC-DMIS inserts the scan into the Edit window.