
 Providing
Instructions Using a Microsoft Word OLE Object
Providing
Instructions Using a Microsoft Word OLE Object
Perhaps one of the simplest ways to provide instructions to those running your measurement routines is to simply use something like Microsoft Word.
This topic and the steps below assume you have Microsoft Word installed on your computer.
Step 1 - Create and Save the Instructions as a Word Document
Create your part setup instructions inside of a Word document.
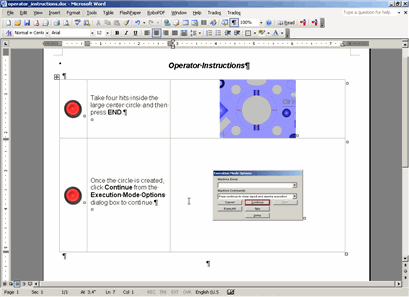
Save the .doc file to a directory on your disk. Feel free to include pictures, tables, and other advanced formatting inside your .doc file. The sample doc file used for this topic looks like this:
Step 2 - Create the Form
Select File | Reporting | New | Form Report to open the Form Editor.
If the Edit window is open, select View | Edit Window to close it giving you more screen space.
Maximize the Form Editor.
Size the form so that it will properly house the contents of your file.
Add any other objects as desired. In the example form used for this topic, a Close Form button was added with the following properties:
Text = "Close Form"
ButtonType = OK
When clicked, the form automatically closes.
Step 3 - Insert the OLE Object
From the Object Bar, click the OLE Object icon. Drag the object so that it fits the entire form except for a half inch margin on all sides. When you release the mouse button, the Insert Object dialog box appears.
Select the Create from File option.
In the File box, either type the complete pathway to the .doc file, or use the Browse button to locate it.
Select the Link check box. This maintains a link between the OLE object on your form and your .doc file, so that if you later update your instructions PC-DMIS will always use the latest information.
Click OK. The document is embedded into your form like this:

Save the form and give it a name of your choice.
The Insert Object dialog box is the same dialog box that appears if you choose to insert an external object into the Edit window by using Insert | Report Command | External Object. Consult the "Inserting External Objects" topic from the "Inserting Report Commands" section if you need more information on this dialog box.
Step 4 - Insert and Test the Form
Select View | Edit Window to make the Edit window visible.
Select Insert | Report Command | Form. Use the dialog box to select your saved form.
PC-DMIS inserts a FORM/FILENAME command block into your measurement routine with a pathway to the form file.
CS1=FORM/FILENAME = <Pathway to Form File>
PARAM/=
ENDFORM/
Mark the command block for execution.
Execute the measurement routine. When PC-DMIS reaches the FORM/FILENAME command block, it displays the form:

Click Continue from the Execute Mode Options dialog box to close the form and resume execution.
Providing
Instructions Using a Microsoft PowerPoint OLE Object
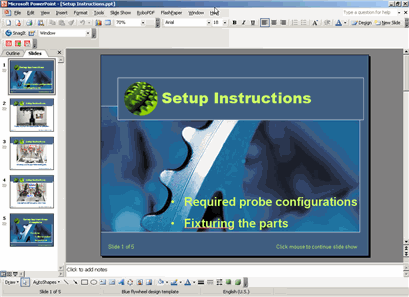
This topic demonstrates how to use a Microsoft PowerPoint file (.ppt) as an OLE object inside of a form to provide detailed slide-show type instructions to an operator.
This topic and the steps below assume you have Microsoft PowerPoint installed on your computer.
Step 1 - Create and Save the Instructions as a PowerPoint
Create your part setup instructions inside of a PowerPoint file (.ppt).
Save the .ppt file to a directory on your disk.
Step 2 - Create the Form
Select File | Reporting | New | Form Report to open the Form Editor.
If the Edit window is open, select View | Edit Window to close it giving you more screen space.
Maximize the Form Editor.
Size the form so that it will properly house the contents of your file.
Add any other objects as desired. In the example form used for this topic, a Close the Form button was added with the following properties:
Text = "Close the Form"
ButtonType = OK
When clicked, the form automatically closes.
Step 3 - Insert the OLE Object
From the Object Bar, click the OLE Object icon. Drag the object so that it fits the entire form, except for a half inch margin on all sides. When you release the mouse button, the Insert Object dialog box appears.
Select the Create from File option.
In the File box, either type the complete pathway to the .ppt file, or use the Browse button to locate it.
Select the Link check box. This maintains a link between the OLE object on your form and your .ppt file, so that if you later update your instructions PC-DMIS will always use the latest information.
Click OK. The PowerPoint file is embedded into your form.

Save the form and give it a name of your choice.
The Insert Object dialog box is the same dialog box that appears if you choose to insert an external object into the Edit window by using Insert | Report Command | External Object. Consult the "Inserting External Objects" topic from the "Inserting Report Commands" section if you need more information on this dialog box.
Step 4 - Insert and Test the Form
Select View | Edit Window to make the Edit window visible.
Select Insert | Report Command | Form. Use the dialog box to select your saved form.
PC-DMIS inserts a FORM/FILENAME command block into your measurement routine with a pathway to the form file.
CS1=FORM/FILENAME= <Pathway to Form File>
PARAM/=
ENDFORM/
Mark the command block for execution.
Execute the measurement routine. When PC-DMIS reaches the FORM/FILENAME command block, it displays the form and the embedded PowerPoint presentation.

Double-click on the embedded presentation. The Microsoft PowerPoint software will launch and display the presentation. When it finishes, PowerPoint will close.
Click Continue from the Execute Mode Options dialog box to close the form and resume execution.