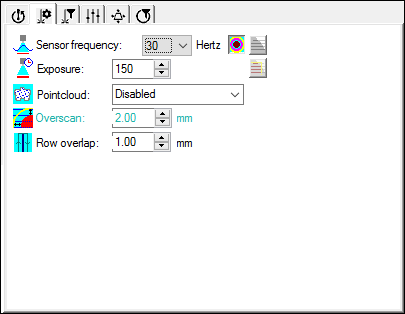
Probe Toolbox - Laser Scan Properties tab
The Laser Scan Properties tab defines how PC-DMIS acquires data from the scan, and whether or not scan lines and feature visualizations appear in the Graphic Display window.
 Show/Hide Stripes - This button toggles the
display of the laser stripes on the part model. Click this button to allow
the laser scan stripes to appear in real time in the Graphic Display window.
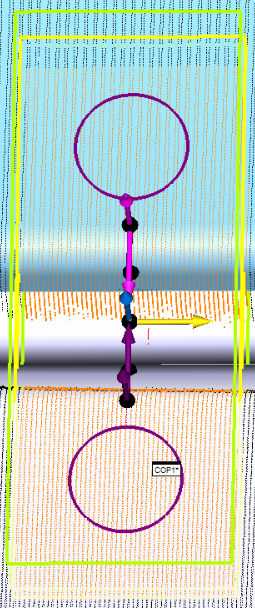
PC-DMIS limits how the stripes appear in the Graphic Display window to
the distance of the feature nominal plus the Overscan value. The software uses the Overscan value to control the amount of clipping
and the visibility of the stripe. The graphic below gives an example of
how these stripes appear.
Show/Hide Stripes - This button toggles the
display of the laser stripes on the part model. Click this button to allow
the laser scan stripes to appear in real time in the Graphic Display window.
PC-DMIS limits how the stripes appear in the Graphic Display window to
the distance of the feature nominal plus the Overscan value. The software uses the Overscan value to control the amount of clipping
and the visibility of the stripe. The graphic below gives an example of
how these stripes appear.
Scan features showing stripes
 Sound ON/OFF - This button turns the sound on
or off. See "Using Sound Events".
Sound ON/OFF - This button turns the sound on
or off. See "Using Sound Events".
 Visualization Tools ON/OFF - This button toggles
the display of the colored visualization tools. For more information,
see "Understanding
the Visualization Tools".
Visualization Tools ON/OFF - This button toggles
the display of the colored visualization tools. For more information,
see "Understanding
the Visualization Tools".
 Show/Hide Segregated Points - This button toggles
the
Show/Hide Segregated Points - This button toggles
the  display of those
points that the software passes to the feature extractor
engine based on the current settings.
display of those
points that the software passes to the feature extractor
engine based on the current settings.
 Initialize Probe - This button starts or initializes
the laser. You can't do anything with the laser until you initialize it.
This takes about 15 seconds. This button appears on this tab for Portable
configurations.
Initialize Probe - This button starts or initializes
the laser. You can't do anything with the laser until you initialize it.
This takes about 15 seconds. This button appears on this tab for Portable
configurations.
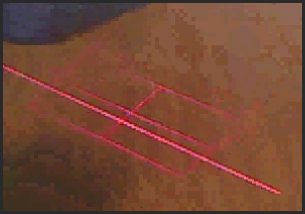
 Projector: This button
is only available for V5 Perceptron probes on manual arms. Click
this button to turn on a projected grid
of red light that shines on the part. This acts like
the cross hairs on a target. As you move the probe toward or away from
the part, the probe's laser scan line moves through this target. For optimal
results, the laser's scan line should line up with the center line of
this target. This essentially serves the same purpose as the scan
line indicator, which helps you to keep the probe at the optimal height
when you measure the part. Since this only functions in manual applications,
PC-DMIS disables this icon if you use the Probe Toolbox within the Auto Feature dialog box.
Projector: This button
is only available for V5 Perceptron probes on manual arms. Click
this button to turn on a projected grid
of red light that shines on the part. This acts like
the cross hairs on a target. As you move the probe toward or away from
the part, the probe's laser scan line moves through this target. For optimal
results, the laser's scan line should line up with the center line of
this target. This essentially serves the same purpose as the scan
line indicator, which helps you to keep the probe at the optimal height
when you measure the part. Since this only functions in manual applications,
PC-DMIS disables this icon if you use the Probe Toolbox within the Auto Feature dialog box.
 AutoZoom ON/OFF - This button turns the laser
AutoZoom functionality on or off. Whenever you start the scan, AutoZoom
dynamically pans, zooms, rotates, and sizes the view containing the laser
data in the Graphic Display window to show the incoming data.
AutoZoom ON/OFF - This button turns the laser
AutoZoom functionality on or off. Whenever you start the scan, AutoZoom
dynamically pans, zooms, rotates, and sizes the view containing the laser
data in the Graphic Display window to show the incoming data.
You can override the limitations with the up and down arrows, or enter a value into any of the boxes. However, your machine rejects invalid values and forces them to a valid number.