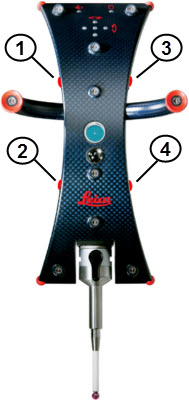
T-Probe Buttons
Button 1 (A) - Stationary Points
Press for less than 1 second - Measures a regular stationary point (duration as defined on the "Options tab"). The shank of the stylus determines the probing direction.
Press for greater than 1 second - Measures a regular stationary point as a "Pulled Hit". To change the vector for the measured point, you can press this button and hold it while you move it to a location that defines the vector. The vector is established by the representative line between the measured point and the release point location. For information about the parameters that affect the way that vectors are recorded, see the "Options tab" topic.
Button 2 (C) - Currently has no functionality.
Button 3 (B) - Done/End
Press for less than 1 second - Ends Feature
Press for greater than 1 second - Displays the Read Out window or enables real-time 3D Distance to CAD. Deletes the last hit.
Button 4 (D) - Scanning Button - Pressing this button starts continuous measurement. Releasing it stops the measurement.
Changing Button Assignments
Button assignments can be set in one of these ways:
You can change the default button assignments of the T-Probe from the Machine Options dialog box (Edit | Preferences | Machine Interface Setup).
Select the T-probe Configuration tab and edit the options for the individual buttons.

Changes to the button configurations from this dialog box define the values for the corresponding PC-DMIS Settings Editor registry entries described below.
You can also change the standard button assignments of the T-Probe in the PC-DMIS Settings Editor if required. To do this, change the number for each of the Leica button entries to the number of the desired T-Probe button.
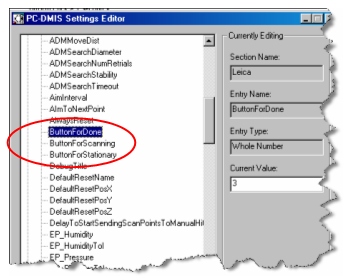
For details on how to edit registry entries, see the "Modifying Registry Entries: Introduction" chapter in the PC-DMIS Settings Editor documentation.
IJK Behavior on T-Probe Points
If aligned to the part, PC-DMIS always stores IJK values perpendicular to one of the active coordinate system axes, except if using Point Only mode.