Execute the measurement routine up to this point to measure the eight surface points. To do this:
From the Edit Window toolbar (View | Toolbars | Edit Window), select Clear Marked
 .
This is done so that the manual alignment point (PNT1) is not
included when you select Mark All.
.
This is done so that the manual alignment point (PNT1) is not
included when you select Mark All.Select Mark All

When the "Ok to mark manual alignment features?" message appears, click NO.
Select Execute
 . The eight
surface points are measured.
. The eight
surface points are measured.
From within the Edit Window, ensure that the LAST line in the measurement routine is highlighted.
Select the Insert
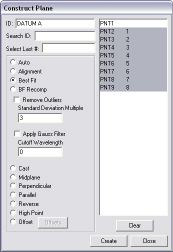
| Feature |Constructed | Plane menu item or the Constructed
Plane button  from the Constructed Features toolbar (View | Toolbars | Constructed Features). The Construct Plane dialog box appears.