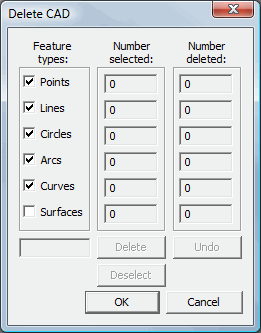
Delete CAD dialog box
The Edit | Delete | CAD Elements menu option displays the Delete CAD dialog box.
You can use this dialog box to permanently remove the CAD elements of selected features from the CAD model in the Graphic Display window.
This can help simplify an imported CAD file before building a measurement routine. For example, a CAD file may contain text or other descriptive information that has no impact on the inspection of the part.
To use this dialog box:
From the Feature types area, mark the CAD element feature types you want to delete.
From the Graphic Display window, press Ctrl + Click (or box-select) to highlight the CAD elements you want to remove.
Click Delete or press the Delete key to preview the deletion. At this point, the items are only temporarily removed, and you can click Undo to restore the temporary deletion.
Click OK to permanently delete the selected CAD elements.
Dialog Box Description
The dialog box contains these items:
Feature types - Determines what feature types to delete. The available types are:
Points
Lines
Circles
Arcs
Curves
Surfaces
Number selected - Shows the number of selected CAD elements for each type.
Deselect - Deselects any highlighted CAD elements.
Number deleted - Displays the number of features that have been deleted. The numbers in these fields change, depending on the features selected in the Feature types area.
Delete - Deletes selected nominal features. If this dialog box is open, you can also press the Delete key to delete the CAD elements. Until you click OK, this is only temporary.
Undo - Restores the recently deleted nominal features. This only works for items that are temporarily deleted. To restore permanently deleted CAD elements, you need to re-import the entire model file.