Using .DRAW Files
PC-DMIS stores quick fixture files with a .DRAW filename extension in the models\quickfix sub-directory where you installed PC-DMIS.
In addition, PC-DMIS stores a definition of each quick fixture in a special data file (.dat filename extension) located in the directory where you installed PC-DMIS.
If the quick fixture was originally shipped with PC-DMIS, it is stored in the QuickFix.dat file.
If the quick fixture is a user-created fixture, its definition is stored in the UserQuickFix.dat file.
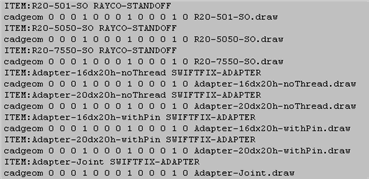
A typical quick fixture data file consists of two lines for each quick fixture, an ITEM: line and a cadgeom line. In a text editor, this file might look something like this:

A Small Sample of the QuickFix.Dat File
To Use Custom Quick Fixture .DRAW Files from a Previous Installation
Close down PC-DMIS and open Windows Explorer.
Before creating new custom fixtures for your new installation, copy the .DRAW files from the models\quickfix sub-directory of your previous installation, and paste them into the models\quickfix sub-directory of your current PC-DMIS installation.
Copy the userquickfix.dat file from the directory of your previous installation, and paste it into the directory of your current PC-DMIS installation.
Restart PC-DMIS. The custom quick fixtures will now appear in the Quick Fixture dialog box along with the fixtures supplied by your current PC-DMIS installation.
The .DRAW quick fixture files will not appear inside of the Quick Fixture dialog box unless the userquickfix.dat file contains the necessary definitions for the file. These definitions get added whenever you import your own custom IGES files as quick fixtures using the Quick Fixture dialog box. For information, see "Adding Custom Fixtures".
If you want to directly use the .DRAW files created by another user, but you don't want to overwrite your own quick fixtures by copying the other user's data file, you would need to use a text editor to merge the necessary ITEM: and cadgeom lines from the other user's data file into your data file.
Using .QFXT Files
You can also save and load fixture files as .QFXT files by using the Quick Fixture dialog box. See the Save and Load buttons discussed in "Using the Quick Fixture Position Dialog Box" for more information.