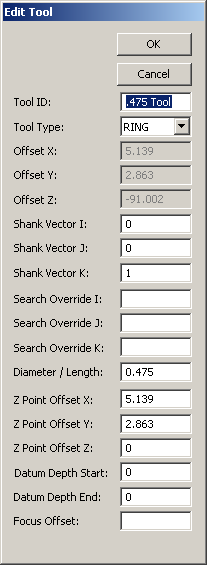
PC-DMIS Vision supports the use of a ring tool for Probe Offset calibration. The ring tool is used for Vision and Multi-sensor machines. See the "Calibrate Probe Offset" topic for information.

Add Tool dialog box - ring tool
Specify the following ring tool values:
Tool ID: Provide a descriptive name for the ring tool.
Tool Type: Ring is selected.
Shank Vector IJK: Specifies the vector of the center axis of the ring tool.
Search Override IJK: These boxes allow you to specify a vector used by PC-DMIS to determine the most efficient order to measure all the tips when you select the User Defined Calibration Order check box in the Probe Utilities dialog box.
Diameter: Provides the diameter of the ring gage hole or bore.
Z Point Offset X: Specifies the X offset of the Z value measurement point from the top center of the bore.
Z Point Offset Y: Specifies the Y offset of the Z value measurement point from the top center of the bore.
Z Point Offset Z: Specifies the Z offset of the Z value measurement point from the top center of the bore.
Datum Depth Start: Specifies the minimum depth into the bore where the bore cylinder is the datum.
Datum Depth End: Specifies the maximum depth into the bore where the bore cylinder is the datum.
Focus Offset: Provides distance in Z from the top surface to the bore circle focus height.