Mini routines enable you to measure a selected dimension or group of dimensions from a long measurement routine. Mini routines offer characteristic-based measurement and the ability to measure a part of a complete measurement routine (such as operation-based measurement).
Because mini routines can execute partial measurements in a measurement routine, you must ensure that there will be no collisions when you execute a partial measurement routine. You are responsible for creating such a measurement routine.
Two modes are available:
ClearanceCube - This mode is the default mode. For this mode, it is essential to have a clearance cube present in the measurement routine.
If you select this mode, mini routines work only with a clearance cube. If the measurement routine is not created with a clearance cube, the following message appears when you click the Execute button in the Mini Routines dialog box:
Mini Routine will work with clearance cube only.
This measurement routine is not using clearance cube.
With the ClearanceCube mode, to avoid collisions between the probe and the part, mini routines work only when ClearanceCube motion is activated. For help with using this feature, see "Using the ClearanceCube".
If you are licensed with the Portable option, then the clearance cube requirement is waived. In this case, the measurements are expected to be done in Manual mode, and there will be no collisions.
FBM - This mode is only available if your LMS license or portlock is programmed with the Feature Based Measurement module. A clearance cube is not required for this mode. The measurement routine must be set up with feature-based measurement so that no collisions occur when the selected features are measured. For more information about feature-based measurement, see "Using Feature Based Measurement".
Using Mini Routines
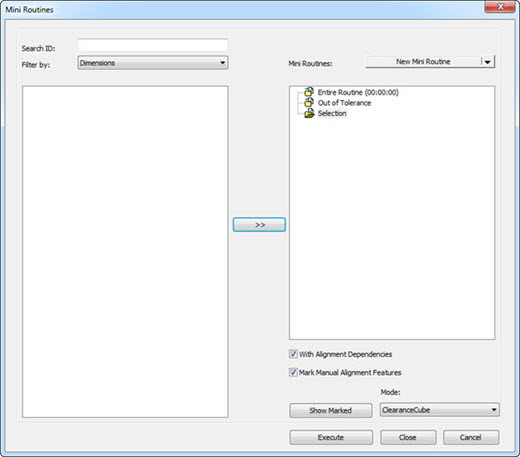
To use mini routines, select File | Partial Execution | Mini Routines. The Mini Routines dialog box appears. For example:

Example of Mini Routines dialog box
The Dimension (left-most) pane displays the items (features, dimensions, and groups) that are available in the measurement routine. The Mini Routine (right-most) pane displays the mini routines.
PC-DMIS automatically creates these mini routines:
All Dimensions - Measures all of the dimensions in the measurement routine.
Out of Tolerance - Measures only the dimensions that are out of tolerance in the measurement routine.
Selection - A "one-time" mini routine that measures items during the current session only. This mini routine will be empty when you re-open the Mini Routines dialog box.
Finding the Items in the Dimension Pane
You can filter to find the items that you want to measure in your measurement routine. The filtered items will display in the Dimension pane.
To filter, do one of the following:
In the Search ID box, type the ID of the item that you want to find, and then press Enter. You can also use meta characters in this box. For help, see "Selecting Features Using Meta-Character Matching".
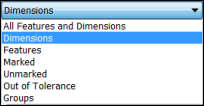
In the Filter by list, select a filtering option:

Filter by list
All Features and Dimensions - Displays the IDs of the features and dimensions.
Dimensions - Displays the IDs of the dimensions. This is the default.
Features - Displays the IDs of the features.
Marked - Displays the IDs of the features that are marked in the measurement routine.
Unmarked - Displays the IDs of the features that are not marked in the measurement routine.
Out of Tolerance - Displays the IDs of the features that are out of tolerance.
Groups - Displays the names of the groups. All dimensions that belong to a group are included in a mini routine.
Tooltips in the Dimension pane give detailed information about dimensions. To display a tooltip, hover your mouse pointer over an item. The tooltip will remain visible until you move the pointer off the item.
If you change the name of an item in the Edit window, PC-DMIS automatically changes its name in the filtered list as well as in the mini routine.
Creating a Mini Routine
To create your own mini routine:
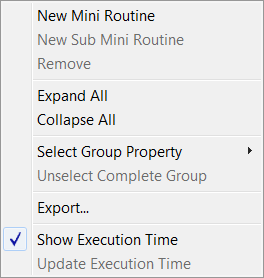
In the Mini Routines list, click New Mini Routine. Or, right-click in the Mini Routine pane, and select New Mini Routine on the shortcut menu:

Mini Routine shortcut menu
New Mini Routine - Creates a new mini routine.
New Sub Mini Routine - Creates a new sub mini routine.
Remove - Deletes the selected mini routine or sub mini routine.
Expand All - Displays all items in all mini routines and sub mini routines.
Collapse All - Hides all items in all mini routines and sub mini routines.
Select Group Property - Displays additional options:
Features and Dimensions Group - This group property indicates that all features and dimensions in the group will be marked. The parents of all dimensions will also be marked.
Whole Group - Marks all of the commands in the group regardless of the type of command. This includes commands that are not features and dimensions, or commands that do not get marked by dependency relations. This property is similar to the marked GROUP command header in PC-DMIS. For more information, see "Performing Operations on Groups".
Unselect Complete Group - Deselects the complete group and displays all of the dimensions in the group.
Export - Saves the tree structure for each mini routine in an .xml file, which you can use with automation. A dialog box appears and prompts you for the name and location of the file.
Show Execution Time - Displays the execution time in <hours>:<minutes>:<seconds> to the right of the Entire Routine option, the mini routine name, and the sub mini routine name.
Update Execution Time - This option is selected by default. If this option is selected, the execution time will be updated every time it is executed. This update function is available for the entire routine as well as for each separate mini routine. If you do not want the time to be updated after every execution, clear this option.
The Update Execution Time option is available when:
The Record and display execution time check box on the General tab in the Setup Options dialog box is selected (for more information about the Record and display execution time check box, see "Execution Area").
The Entire Routine option is selected.
A mini routine or sub mini routine is selected.
Click on the default name that appears, and type a name of your choosing.
To create another mini routine, click on the icon of any existing mini routine to select it, and then select New Mini Routine. This places the mini routine at the root level of the tree structure.
Creating a Sub Mini Routine
You can create a sub mini routine for a mini routine that has no items.
Select the desired mini routine.
In the Mini Routines list, click New Sub Mini Routine. Or, right-click in the Mini Routine pane, and select New Sub Mini Routine on the shortcut menu.
Click on the default name that appears, and type a name of your choosing.
Adding Items to Mini Routines
In the filtered list in the Dimension pane, select each item that you want to add to a mini routine or sub mini routine.
To display additional selection options, right-click in the pane. A shortcut menu appears:

Filtering shortcut menu
Select All - Selects all of the items in the filtered list.
Unselect All - Deselects all of the items in the filtered list.
Expand All - Displays all features and dimensions in all groups.
Collapse All - Hides all features and dimensions in all groups.
With Filter by set to Groups, select Expand All and then click on each item in a group that you want to add to a mini routine or sub mini routine.
In the Mini Routine pane, click on the icon for the desired mini routine or sub mini routine to select it.
Click >> to move the selected items from the Dimension pane to the selected mini routine.
To save your changes to mini routines at any time, click Close. To discard your changes to mini routines, click Cancel. The Mini Routines dialog box closes.
When you select the Close button to close the dialog box, PC-DMIS automatically saves the mini routines as an .xml file with this naming convention:
<name of measurement routine>.MiniRoutines.xml
This file is saved in the folder in which the measurement routine resides. When you open the measurement routine, the data in the .xml file will display in the Mini Routines dialog box.
If you send the measurement routine to another machine, you must include the <name of measurement routine>.MiniRoutines.xml file in order to see the mini routines on the other machine.
Executing a Mini Routine or Sub Mini Routine
Click on the icon for the mini routine or sub mini routine to select it.
If you want to measure the mini routine with alignment dependencies, select the With Alignment Dependencies check box. To measure them without alignment dependencies, clear the check box.
The availability of the With Alignment Dependencies check box depends on the setting for the MiniRoutineWithAlignDependencyEnabled registry entry in the Settings Editor application. If the registry entry is enabled, the With Alignment Dependencies check box is available. If the registry entry is disabled, the check box is dimmed and unavailable to prevent unauthorized or unintentional use.
"Alignment dependencies" means that the features required for creating an alignment of the selected items will be marked and measured. For example:
Suppose that PC-DMIS has measured the part. The part has not moved yet, and you want to re-measure certain features. You can measure the mini routines and sub mini routines without measuring the alignment features again.
Suppose that PC-DMIS has measured the part. You then notice that one hole is dirty, and you need to measure only the dimensions that are associated with that hole. You can measure the dimensions with alignment dependency because the part has moved and needs to be realigned.
To mark manual alignment features for measurement, click Mark Manual Alignment Features.
To mark the features and dimensions that will be measured, select the desired mini routine or sub mini routine and click Show Marked. The features and dimensions will be marked in the Edit window.
Select ClearanceCube or FBM in the Mode list. For descriptions, see "Modes".
Click Execute. PC-DMIS closes the Mini Routines dialog box and displays the Execution dialog box.
Example of Creating Mini Routines and Sub Mini Routines
This example creates mini routines and sub mini routines for a part. The part is manufactured in two operations: Operation 10 and Operation 20. Operation 10 manufactures the part in Station 1 and Station 2. This example assumes that a measurement routine has been created to measure the entire part.
In the Mini Routine pane, find the items to measure in the measurement routine.
Create the mini routines and sub mini routines:
Click New Mini Routine. MiniRoutine1 appears.
Click New Mini Routine again. MiniRoutine2 appears.
Rename MiniRoutine1 to Op10, and MiniRoutine2 to Op20.
Select Op10 and then click New Sub Mini Routine. Op101 appears.
Select Op10 again and then click New Sub Mini Routine. Op102 appears.
Rename Op101 to Station 1, and Op102 to Station 2.
In the Dimension pane, select the items to measure.
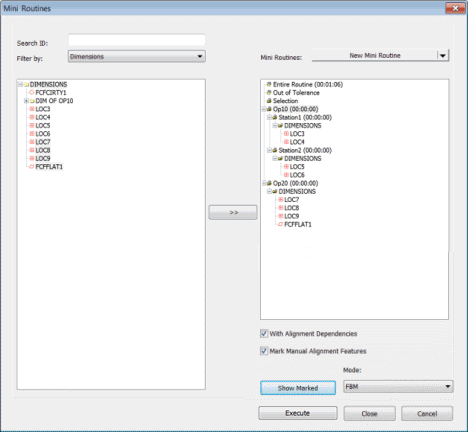
Move the selected items to the Station 1 and Station 2 sub mini routines, and the Op20 mini routine. For example:

Example of mini routines and sub mini routines
Station 1 has the dimensions of the features manufactured by Station 1. Station 2 has the dimensions of the features manufactured by Station 2.
Click Close. PC-DMIS saves the data as an .xml file in the folder in which the measurement routine resides.
Example of Executing Mini Routines and Sub Mini Routines
To execute the Op10 mini routine, select it and then click Execute. It will measure the dimensions of the features manufactured in Operation 10.
To execute the Op20 mini routine, select it and then click Execute. It will measure the dimensions of the features manufactured in Operation 20.