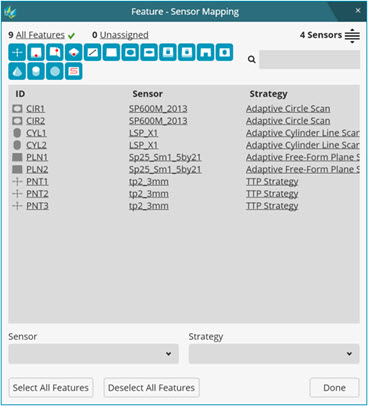
You can use the Feature - Sensor Mapping dialog box to assign or map features to probes (sensors). A sensor with a mapped feature, measures that feature during execution.
To open the Feature - Sensor Mapping dialog box, do one of the following:
Select Edit | Preferences | Feature - Sensor Mapping.
The software opens an empty dialog box. You can then use QuickFeatures to populate the dialog box. For more information on QuickFeatures, see "Creating QuickFeatures" in the "Creating Auto Features" chapter.
If the menu item is disabled, be sure to close any instances of the Measurement Strategy Editor.
Select File | Import | Inspection Plan. Then choose a supported inspection plan file type (.plancad or .planxml) and click Import.
The software populates the dialog box with the features in the inspection plan. You can then use QuickFeatures to populate the dialog box with additional features.

Feature - Sensor Mapping dialog box
In the Edit window, position the cursor after the LOADPROBE command. If the cursor is not positioned after the command, QuickFeature selection is possible, but the Edit window will not be populated with the selected features.
From the Feature - Sensor Mapping dialog box, from the feature list, select one or more features. You can then use the feature icons to filter by feature type. The software highlights the features that you select from this list in the Graphic Display window. Press Shift key and position your mouse pointer over a feature in the Graphic Display window. Then click the feature to add it to the list. The features are not added to the Edit window until you click Done.
You can use the Shift key to select multiple sequential features and the Ctrl key to select multiple non-sequential features. Each selected feature is highlighted in the Graphic Display window.
From the Sensor list, select the probe to which you want to assign the selected feature or features. Any new features added to the list are also assigned this sensor.
If you want to use a specific strategy for those features, from the Strategy list, choose a strategy.
Click Done to complete the mapping and to continue the import process.
Be patient while the software does post processing and finishes the import. This process can take a long time. On a standard test computer, 18 features mapped to two probes took about a minute.
Once the software finishes the import, the Edit window shows LOADPROBE commands for each probe you selected. After each LOADPROBE command, the Edit window shows the features that you mapped to that probe.
To Organize Features by Sensor Order
You can also define a probe order and organize your imported features according to that order.
From the Feature - Sensor Mapping dialog box, start to assign features as usual according to the above procedure.
Before you click Done,
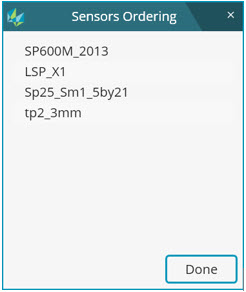
click the Sensors Ordering button  (top right of dialog box) to open the Sensors
Ordering dialog box. This dialog box shows a list of the current
mapped probes.

For one or more probes, select the probe, and then drag and drop (or click the up and down arrows) to change the probe order.
From the Sensor Ordering dialog box, click Done to use the order when PC-DMIS finishes the import.
From the Feature - Sensor Mapping dialog box, click Done to finish the import.
Once the software finishes the import, the order of LOADPROBE commands matches the probe order you defined in the Sensors Ordering dialog box.
Description of the Feature - Sensor Mapping Dialog Box
All features - This text selects all the features in the feature list. It also shows the number of features.
Unassigned - This text selects those features that you have not yet assigned to a sensor.
Sensors - This text shows
the current number of sensors in the sensor list. The Sensors
Ordering  button next to Sensors opens the Sensors
Ordering dialog box. You can use the Sensor
Ordering dialog box to define a sensor order and organize your
imported features according to that order.
 - The
search box filters the feature list by the text you type here.
![]() - The feature icons filter the feature
list. Features that match the selected icons appear in the feature list.
- The feature icons filter the feature
list. Features that match the selected icons appear in the feature list.
Feature list - This list shows all the imported features in the inspection plan, along with the sensor and strategy assigned to them. Click any of the column headers to rearrange the list in alphanumeric order based on that column. When you click Done, the features are organized in the same order in the Edit window with the LOADPROBE command for the selected sensor added.
The features list contains these columns:
ID - This column shows a symbol and name for each imported feature.
Sensor - This column shows the sensor name assigned to that feature.
Strategy - This column shows the current strategy for the feature. If nothing appears here, then the software uses the default strategy for that feature. For information on how to define strategies, see "Using the Measurement Strategy Editor" topic in the "Setting Your Preferences: Introduction" chapter.
Sensor - This list shows all the sensors available to the measurement routine.
Strategy - This list shows all the available strategies.
Select All Features - This text selects all the features in the feature list.
Deselect All Features - This text deselects all the features in the feature list.
Done - This button applies the feature to sensor mapping as shown in the Feature - Sensor Mapping dialog box.