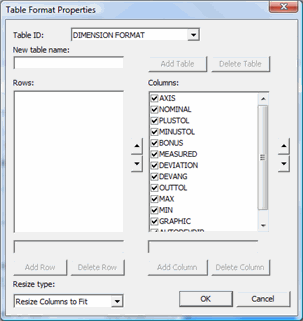
The Table Format dialog box works with a GridControlObject's defined column and row names, which enables you to control the visibility and order of columns and labels in a GridControlObject in a label template. To access this dialog box, from the Edit Rule dialog box, click the Grid Format button. For information on the Edit Rule dialog box and the Grid Format button, see "Defining a Rule in the Rule Tree Editor".

Table Format Properties dialog box
This dialog box contains different table formats. A table format simply defines how you want named rows and columns to appear in your final report. This dialog box lets you change the order and visibility state of all existing table formats. You can also use this dialog box to create your own custom table formats.
For the pre-existing table formats, the only thing you can modify is their visibility state and the order of their rows or columns. You cannot delete these table formats nor change what rows or columns they have.
To use table formats, you must first use a label template with a GridControlObject that has its columns or rows already named.
The following properties are available:
Table
ID
Lists all available table formats.
New Table
Name
Defines a new table format.
Add Table
Adds the new table format. This button only becomes enabled when you type
a name in the New Table Name box.
Delete
Table
Deletes the selected custom table format. This button only becomes enabled
when you select a custom table from the Table ID
list.
Rows
Lists the rows and columns in your table format. You can reorder them by
clicking the up and down arrows.
Add Row/Column
Adds a row or column name to the Rows or Columns area. You can only add to custom table
formats.
Delete
Row/Column
Deletes the selected row or column from the Rows
or Columns area. You can only delete items from
custom table formats.
Resize
Type
Determines what the table will when you show or hide columns. The list
contains three items:
Resize Grid - This retains existing column sizes and resizes the grid to fit the new width.
Resize Columns to Fit - This retains the grid's existing width and resizes each column equally to fit that width.
Hide Text - This doesn't resize the grid or the columns. It simply hides the text.
Cancel
Closes the dialog box without applying any changes.
OK
Uses the selected table format for the rule in the Rule
Tree Editor or for the TABLE/FORMAT
command in the Edit window.
To name a column or row in a GridControlObject:
In the Label Template Editor, select the GridControlObject.
Double-click on the first cell in a column or row.
Right-click to access the property editor.
Click either the Cell or Column tab.
In the Row Label box or Column Label box enter a value. You can select from the list or type a custom value. Custom labels can only show up on custom table formats.
To reorder columns or rows:
Select a table format from the Table ID list.
Its rows or columns already appear.
In the Rows
or Columns area, select the row or column
you want to reorder, then click the up  or down
 arrow buttons to either send that
item either up or down in the list. Items higher in the list get displayed
before others.
To show/hide columns or rows:
Select a table format from the Table ID list. Its rows or columns already appear.
In the Rows or Columns area, clear the check box to the left of the row or column name to hide that item in the label. Select the check box to show it in the label.
To create a custom table format:
In the New Table Name box, type a name.
Click the Add Table button. The custom table appears in the Table ID list and remains until you delete it.
In the Add Row or Add Column box, type a name that matches a row or column label name you gave to the GridControlObject.
Click Add Row or Add Column to add that item to the table.
Continue adding row or columns and deleting or rearranging them as desired until the table format contains the information you want.
Removing your Modifications
To quickly remove a modification, right-click on the desired report object (a TextReportObject, CADReportObject, or Label object), and select the Remove Object Modifications button.

PC-DMIS returns the report object back to its default state.