 )
from the Probe Mode toolbar.
)
from the Probe Mode toolbar.The POINT AUTOTRIGGER command tells PC-DMIS to automatically take a hit when the probe enters a tolerance zone at a specified distance from the original hit location. For example, if the tolerance zone, the Radius value, is set to 2 mm, a hit is taken when the probe is within 2 mm of the hit location.
You can use this option with manual machines; instead of pressing a button to take a hit, you can place POINT AUTOTRIGGER commands at any standard location in the Edit window.
You can add a POINT AUTOTRIGGER
command from the Insert Command button on the
Point AutoTrigger
area of the Probe Trigger Options tab on the
Parameter Settings dialog box (press F10 to
access this dialog box). You can also do this with the Point
Auto Trigger Mode button ()
from the Probe Mode toolbar.
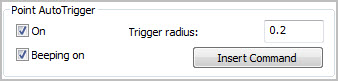
Point AutoTrigger area on the Probe Trigger Options tab
In addition to the standard supported features (as noted in the "Probe Trigger Options" topic), the AUTOTRIGGER command supports the Auto Vector Point feature and the Measured Point feature.
On: Selecting this check box activates the POINT AUTOTRIGGER command. Commands in the Edit window that follow the inserted POINT AUTOTRIGGER command will use the point auto trigger functionality as defined.
If you do not select this check box, and you click the Insert Command button, PC-DMIS inserts the command line into the Edit window but doesn't activate the command.
Beeping on: Selecting this check box activates a beeping sound associated with your POINT AUTOTRIGGER command. As you approach the target with the probe, the beeps become more frequent.
Trigger radius: This box allows you to type a tolerance zone value. When the probe moves into this tolerance zone, it automatically and immediately takes a hit.
Insert Command: Clicking the Insert Command button inserts the POINT AUTOTRIGGER command into the Edit window for the current measurement routine.
This command line reads:
POINT AUTOTRIGGER/ TOG1, TOG2, RAD
TOG1: This toggle field corresponds to the Point AutoTrigger On check box. It displays either ON or OFF.
TOG2: This toggle field corresponds to the Beeping On check box. It displays either ON or OFF.
RAD: The radius field contains the value for the tolerance zone, and it corresponds to the Trigger radius box. This value is the distance from the actual point that PC-DMIS takes the hit.