To scan the surface along a line, select Insert | Scan | Line. The LINE tab in the BASICSCAN dialog box appears:
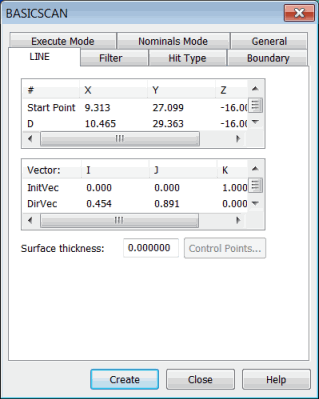
BASICSCAN dialog box - LINE tab
This scan needs a start point, a direction point, and an end point. It uses the start and end points for the line, and the direction point to calculate the cut plane. The probe always remains within the cut plane while doing the scan.
The line basic scan also uses the following vectors for execution:
InitVec: The initial touch vector indicates the surface vector of the first point in the scanning process.
CutVec: The cut plane vector is the cross product of the InitVec and the line between the start and end point. If there is no end point, the line between the start point and direction point is used.
EndVec: The end vector is the approach vector at the end point of the line scan.
DirVec: The direction vector is the vector from the start point to the direction point.
The cut vector is the cross product of the initial touch vector and the line between the start and end points.
Defining a Line Basic Scan
Select the start point in the # column, and then either double-click it to type in a value, or click on the CAD model to select a point from the selected surface.
Select the direction point (D) in the # column, and then either double-click it to type in a value, or click on the CAD model to select a point from the selected surface.
Select the end point in the # column, and then either double-click it to type in a value, or click on the CAD model to select a point from the selected surface.
Modify the vectors as needed.
Complete the options on any other tabs as needed in the BASICSCAN dialog box, and then click OK. PC-DMIS inserts the line scan into the Edit window.
The Edit window command line for a line basic scan is:
SCN5 =BASICSCAN/LINE,NUMBER OF HITS=16,SHOW HITS=NO,SHOWALLPARAMS=YES
<194.592,96.658,0>,<208.587,92.377,0>,CutVec=0.2925585,0.9562476,0,
DirVec=0.9562476,-0.2925585,0
InitVec=0,0,1,EndVec=0,0,1,THICKNESS=0,PROBECOMP=YES,AVOIDANCE MOVE=NO,DISTANCE=0
FILTER/DISTANCE,1
EXEC MODE=RELEARN
BOUNDARY/PLANE,<208.587,92.377,0>,PlaneVec=-0.9562476,0.2925585,0,Crossings=1
HITTYPE/VECTOR
NOMS MODE=NOM,10
ENDSCAN
More: