Changing the Scan Speed
You can set the scan speed at theoretical scan points
for defined laser scan paths. PC-DMIS then moves the laser probe at this
speed after it crosses the theoretical point during the scan.
On a very large part, you can do the following:
Collect more points in the area where there
are features such as circles and slots. To collect more points, you
can lower the scan speed where you need to extract the features.
Collect less points in the area where there
are no features. To collect less points, you can increase the scan
speed where there are no features to extract.
These speed change point settings give you more control
over the scan speed and can help reduce the scan time.
To change a scan speed, do the following:
From the Theoretical Scan
Points area, select a theoretical scan point.
Right-click on the selected theoretical scan
point row to display the menu.
From the menu, select Change
scan speed to open the Edit Scan Speed
dialog box. Type the value in the Scan speed
box.
To calculate the scan speed from the laser
stripe spacing distance, click the Calculate Laser
Stripe Spacing icon  .
This opens the Calculate Scan Speed dialog
box.
.
This opens the Calculate Scan Speed dialog
box.
Type the value in the box and click Calculate.
PC-DMIS calculates the scan speed in millimeters per second. PC-DMIS
then inserts the calculated value in the Scan speed
box of the Edit Scan Speed dialog box.
Click OK to set this
scan speed value.
Setting Speed at Multiple Points
To set scan speed at multiple theoretical points, press
Ctrl and click the points in the # column. PC-DMIS
highlights in yellow all the selected items on the CAD. To deselect a
point, press Ctrl and click on the selected point.
To select scan speed change points on the CAD, click
the spheres on the CAD in the Graphic Display window. PC-DMIS then highlights
the points in yellow. To deselect a point, click on a selected sphere.
To select multiple points on a CAD, click the points
to select them. To deselect all points, click anywhere in the grey area
of the dialog box.
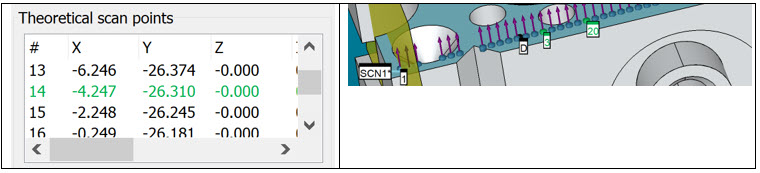
Textual (green text) and Graphical (green sphere) representation
view of theoretical scan points. In the Graphic view, a label with scan
speed (in green) shows the speed set at that point.
Right-click Menu
Delete All Theoretical Points
- This option deletes all theoretical points in order to recreate your
scan.
Change scan speed - This
option lets you change the speed at a single theoretical point. The scan
now uses this speed.
Reset scan speed - This option
resets the scan speed for the selected theoretical point back to the original
speed.
Reset all scan speeds - This
option resets the scan speed for all theoretical points back to the original
speed.
When you click the Generate
or Spline Points button, PC-DMIS modifies the
path points. If you assign the scan speed change to the points of the
original path, PC-DMIS tries to find the closest point to the original
scan speed change point within a small tolerance. If a close point is
available, PC-DMIS assigns a new scan speed change point. If a close point
is not available, PC-DMIS removes the scan speed change point.
After you click the Generate
or Spline Points button, ensure that all the
path points are defined.
The speed change points are available only on machines
with the FDC controller. If the controller does not support control points,
PC-DMIS executes scans without changing the scan speed.
In PC-DMIS 2020 R1 and earlier, PC-DMIS doesn't support
speed change points. If you save a measurement routine to PC-DMIS 2020
R1 and earlier, PC-DMIS removes the speed change points. When you open
the measurement routine in that older version, the speed change points
are not available. This ensures that you execute your measurement routine
at the constant scan speed.