Auto-Inspect mode provides automated inspection of a sequence of points using a Leica tracker. This process is essentially the same as the typical point inspection process, except that the process may run unattended as the tracker automatically moves from one position to the next one.
This process is often used for deformation measurements or repeated stability studies over a long time range. Each of the positions that are going to be auto inspected are typically equipped with a separate reflector.
For example, some typical cases for Auto-Inspect might include:
Inspecting four points distributed over the full working range of the laser tracker. Those four points could be inspected automatically at the beginning and end of a measurement routine to verify that the tracker position has not moved during the measurement process.
Checking the repeatability of 10 reflector positions mounted to a large structure. For example, you could measure these 10 points every 15 minutes over a time span of 24 hours.
To use Auto-Inspect mode:
Open or create a measurement routine.
Insert a Manual/DCC mode command, and set it to DCC.
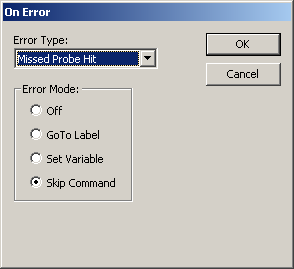
Select the Insert | Flow Control Command | On Error menu item to insert an On Error command.
On Error dialog box
Select the 'Missed Probe Hit' Error Type and the Skip Command option.
Insert points for each mounted reflector. To insert each point into your measurement routine:
Aim the tracker at the reflector.
Press Ctrl+H to take a hit.
Press the End key on your keyboard.
Execute the measurement routine.
In execution mode, PC-DMIS automatically measures each of these points as follows:
The Leica tracker points to the first point (position).
The laser locks onto the positions if possible. If no reflector is there, or no reflector has been found with the current search settings, PC-DMIS continues to the next feature.
If the laser locks onto the reflector, it measures the point.
The process is repeated (steps 1 through 3) until PC-DMIS has measured or skipped all points.
For any points that were skipped, error message "Reflector not Found" displays to alert you to the problem or problems. You can then take corrective action for skipped points. The error contains a message that there was an error, the feature ID for the error, and the coordinate location of the feature. The report also contains a message for any points that were skipped.