Step 4: Construct Datum A
Once you have measured the eight surface points in
"Step 3: Measure
Features for Datum A", you can construct DATUM
A from those points.
To construct DATUM A:
Execute the measurement routine up to this
point to measure the eight surface points. To do this:
From the Edit
Window toolbar (View | Toolbars | Edit Window),
select Clear Marked  .
This is done so that the manual alignment point (PNT1) is not included
when you select Mark All.
.
This is done so that the manual alignment point (PNT1) is not included
when you select Mark All.
Select Mark
All  .
.
When the "Ok to mark manual alignment features?" message appears,
click NO.
Select Execute
 . PC-DMIS measures
the eight surface points.
. PC-DMIS measures
the eight surface points.
From within the Edit Window,
ensure that the LAST line in the measurement routine is highlighted.
Select the Insert | Feature
|Constructed | Plane menu item or the Constructed
Plane button  from the Constructed Features toolbar (View | Toolbars | Constructed Features). The Construct Plane dialog box appears.
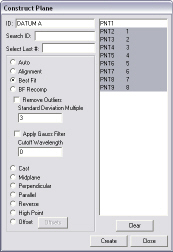
Select the  Best Fit option.
From the feature list, highlight the eight surface points measured in "Step
3: Measure Features for Datum A". In this example, the points
are PNT2 through PNT9.
Type DATUM A in the
ID box.
Click Create, and
then click Close to add the plane feature
to the measurement routine.
Next Step ...