Click on any of the tabs along the top, or buttons along the bottom of the image below, to display information on their functionality.
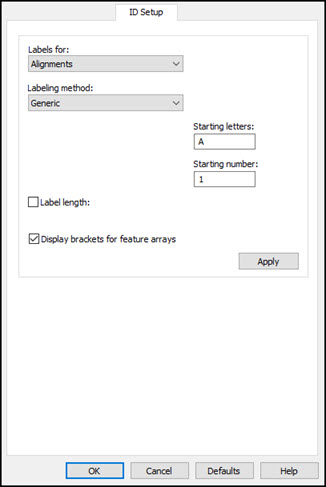
Setup Options dialog box-ID Setup tab
Be sure to keep track of IDs already set when changing an identification. It is possible to have ID duplication through multiple changes to this option.
The ID Setup tab allows you to alter the format used to identify alignments, dimensions, features, comments, labels, variables, and other items.
To access this option:
Access the Setup Options dialog box (Edit | Preferences | Setup).
Select the ID Setup tab.
The default Labeling method is Generic. As each feature is created, PC-DMIS assigns it an ID beginning with the letter F, followed by a number (incrementally set from the starting number of one). You may choose to override this setting by selecting options on this tab.
Feature ID Rules
When modifying IDs, follow these rules:
Do not use space characters (use an underscore instead).
Do not duplicate feature names for different features.
Do not use names that are identical to PC-DMIS keywords or commands (ALIGN, PROBE, OFFSET, and many more).
Do not share names between ID types. For example, an alignment ID should not have the same ID as a feature ID or a label ID.
All IDs should be alphanumeric. You may use an underscore or a dash.
IDs should start with a letter.
Avoid using these miscellaneous characters: @ # $ % & * ( ) + = / \ [ ] { }
While PC-DMIS does not prevent you from changing a feature ID to anything you want, ignoring these rules may cause problems with expressions, reporting, or how that ID functions with routines that use other products (like DataPage+, Microsoft Excel, and so on).
Options in the ID Setup Tab
Labels for - The Labels for drop-down list is used to select the identification used for these items: (See "Labeling Method".)
Alignments
Generic is the only method available for identifying
alignments.
Comments
Generic is the only method available for identifying
comments.
Dimensions
Dimensions can be identified using either the Generic
or By Type method. If the By
Type method is used, identifications can be similar to each dimension
type, or different based on individual need.
Features
Features can be identified using either the Generic
or By Type method.
If the By Type method is selected, the color used to display the feature ID can also be altered.
If the Show All ID check box is selected and you click Apply, PC-DMIS displays all feature ID labels in the Graphic Display window for all features from the current cursor location to the end of the measurement routine. Newly created features also show their ID. If this check box is deselected and you click Apply, all features IDs from current cursor location to the end of the measurement routine are hidden. Newly created features still get created in the Edit window, but the ID label doesn't appear in the Graphic Display window.
If the Color option is selected (marked), all features created after the Apply button is pressed will be affected. (Features created prior to the color change will not be replaced.)
Labels
Generic is the only method available for identifying
labels.
Variables
Generic is the only method available for identifying
variables.
Call
Subs
Generic is the only method available for identifying
Called Subroutines.
Spc Queries
Spc queries can be identified using either the Generic
or By Type method.
Feature
Control Frames
Feature Control Frames can be identified using either the Generic
or By Type method.
Pointcloud
Operators
Pointcloud Operators can be identified using either the Generic
or By Type method. If the By
Type method is used, identifications can be similar to each operator
type, or different based on individual need.
Labeling Method - This drop-down window is used to select between By Type and Generic identification methods.
By Type
By Type lets you set the identification for each element type (for example:
circle, cone, cylinder, line, plane, point, sphere, and so on).
Generic
Generic will apply the same identification system
regardless of feature (dimension) type.
PC-DMIS has no inherent limit on the number of letters used for identifications. However, the Graphic Display area and Edit window have limits on the ID length. Even if the Edit window does not show the complete ID, PC-DMIS internally keeps track of the complete identification.
Starting Letters - This box determines the first letter or letters used in the identification process. PC-DMIS always displays the ID using capital letters.
In various dialog boxes where the ID is displayed, if you modify the ID there, PC-DMIS displays a prompt asking you if you would like to change the default ID for that item type.
Starting Number - The Starting Number box determines the first number used in the identification process. Any number between 1 and 9999 can be entered.
In various dialog boxes where the ID is displayed, if you modify only the number portion of an ID, the counter may be reset to a desired count.
Label length - The Label length check box determines the length of
the identification. Selecting it displays a small edit box, into which
you can type a number value. The check box must be selected in order for
this option to be active. If this length is set, PC-DMIS appends zeros
to the ID letters to make up the necessary length. 

Display brackets for feature arrays
- The Display brackets for feature arrays
check box determines whether array brackets are displayed with IDs for
commands executed more than once. When selected, the inspection report
displays which instance of the command's execution is being referenced.
Apply - The Apply button applies the changes described in "Labeling Method") to any feature identifications. These changes only apply to feature IDs. If the Apply button is not pressed, PC-DMIS will continue to assign feature identifications using the previous method listed.
If duplicate IDs are assigned, PC-DMIS notifies you that you must have a unique ID for any feature, dimension etc.
Default - The Default button allows you to update the default settings to all of the ID Setup parameters. When a new measurement routine is created, it will reflect any changes made to the parameters, only if the Default button is clicked. For additional information on Default buttons, see the "Default" topic in the "Navigating the User Interface" chapter
Always press the Apply button after a change is made (before you press the OK or Default buttons).
