 Trace
Field Dialog Box
Trace
Field Dialog BoxWith the Trace Field dialog box, you can insert a TRACEFIELD command in the Edit window. (You can also manually type the command into the Edit window.)
Select Insert | Statistics Command | Tracefield to open the Trace Field dialog box.
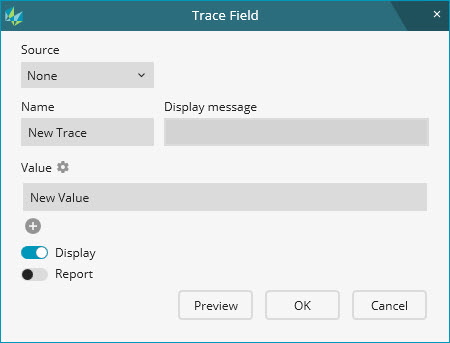
Trace Field dialog box
Source - This list defines the location from where PC-DMIS gets the tracefield information.
None - This option lets you type the tracefield name, display message, and value in the dialog box.
Q-DAS - This option reads tracefield information from the Q-DAS configuration file. This option is only available if you insert the TRACEFIELD command after the STATS/ON,Q-DAS command in a measurement routine. For more information on how to create a Q-DAS configuration file, see the Q-DAS Configurator help file.
Name - This box defines the tracefield's name.
If you select None from the Source list, type the trace name in the box.
If you select Q-DAS from the Source list, the Name box becomes a drop-down list. From the list, select the trace name.
The drop-down list displays the trace names from the Q-DAS configuration file. (You can choose a different configuration file from the Statistic/ON Q-DAS dialog box.)
Each trace name displays a tooltip that provides information about the K-field description.
Display message - This message is the message that PC-DMIS shows for the trace during execution.
If you select None from the Source list, type the message in the box.
If you select Q-DAS from the Source list, the Display message box displays a trace name's description from the Q-DAS configuration file. You cannot edit this description.
Value - This box defines the tracefield's value. You can define the settings for the value.
Click the Value settings
icon ![]() to open the Value settings
dialog box. This dialog box lets you define settings for the value.
When you type the value in the Value box,
PC-DMIS validates the value with the settings.
to open the Value settings
dialog box. This dialog box lets you define settings for the value.
When you type the value in the Value box,
PC-DMIS validates the value with the settings.
If you select Q-DAS from the Source list, you cannot define the settings in the Value settings dialog box. PC-DMIS validates the value based on the selection of the configuration file.
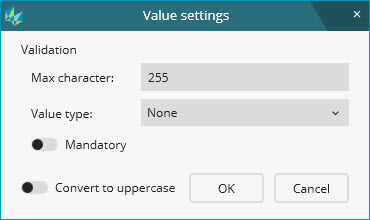
Value settings dialog box
Max character - This option defines the maximum number of characters for the value. You can type any number between 1 and 255, inclusive. The default value is 255.
Value type - This option defines the type of value. From the list, you can select the type.
None - This type lets you enter any value with the limited number of characters set in the Max character box.
Integer - This type lets you enter the whole number.
Float - This type lets you enter the decimal value.
Date/Time (dd.MM.yyyy[/HH:mm:ss]) - This type lets you enter the date and time in the format:
dd.MM.yyyy/HH:mm:ss or dd.MM.yyyy
where
dd - Day of the month as digits. Use a leading zero for single-digit dates.
MM - Month as digits with a leading zero for single-digit months.
yyyy - Year represented by four digits.
HH - Hours with a leading zero for single-digit hours; 24-hour clock. For example, 9 A.M. appears as 09:00. 1 P.M. appears as 13:00.
mm - Minutes with leading zero for single-digit minutes.
ss - Seconds with leading zero for single-digit seconds.
Alphanumeric - This option lets you enter characters such as letters and decimal digits.
File name - This type lets you enter the file name based on your computer's operating system.
In the Windows 10 operating system, the file name does not allow characters such as \, /, :, *, ?, ", <, >, and |.
Mandatory - This switch determines whether the operator can skip the trace during execution. If you turn on the switch, the operator cannot skip the trace during execution and must type a value.
Convert to uppercase - This switch converts the value characters into uppercase.
You can have a single value, or you can have multiple
rows of values. To add a row for a value, click the Add
button  .
.
If the Display
switch is on, PC-DMIS adds a Remove
button ( ) for each row.
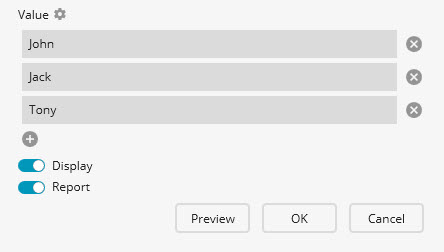
During execution, the value in the first row becomes the selected value. You can change the value from the list when PC-DMIS displays the dialog box during execution. Otherwise, PC-DMIS sends the selected value to the statistical database.
If the Display
switch is off, PC-DMIS adds a check box and Remove
button () for each row.
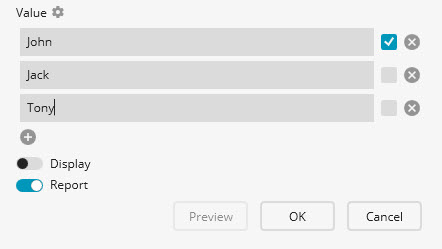
To set a value as the selected value, mark the check box next to the value. During execution, PC-DMIS displays this value as the selected value.
To hide the dialog box during execution, and send the selected value to the statistical database, you can turn off the Display switch in the Trace Field dialog box.
To remove a row for a value, click the Remove
button.
Display - This switch shows or hides the Trace Field dialog box during execution. If you hide the Trace Field dialog box, PC-DMIS doesn't display the dialog box for the operator to type or select the value. PC-DMIS sends the current value to the statistical software.
Report - This switch shows or hides the name of the trace and its value in the measurement report.
If the tracefield name is Operator, the value is Sam, and the source is None, then the report shows:
TRACEFIELD Operator = Sam
If the trace name is K0008, the value is Sam, and the source is Q-DAS, then the report shows:
TRACEFIELD Source = Q-DAS, K0008 = Sam
Preview - This button lets you preview the tracefield in a Trace Field Preview dialog box.
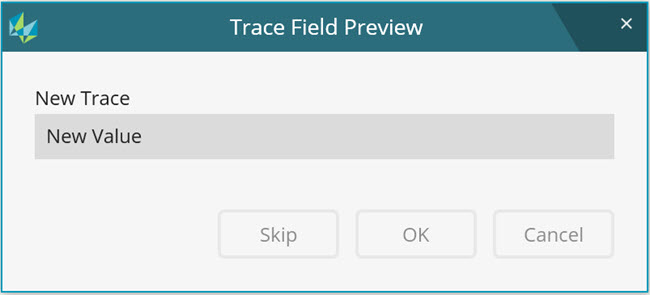
Trace Field Preview dialog box
The preview dialog box
mimics the actual Trace Field dialog box
that PC-DMIS shows during execution. Click ![]() to close
the preview.
to close
the preview.
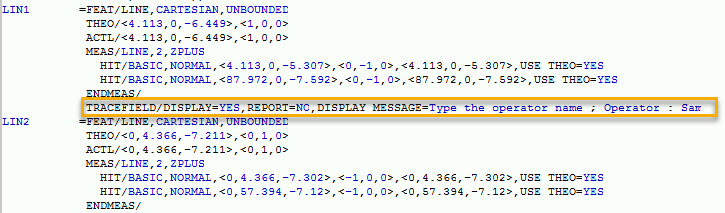
Here's an example of a TRACEFIELD command in the Edit window:
TRACEFIELD/DISPLAY=YES,REPORT=NO,DISPLAY MESSAGE=Type Operator name ; Operator : Sam
TRACEFIELD/DISPLAY=YES,REPORT=NO,DISPLAY MESSAGE=Batch number / Ident number ; K0006 : 4
 TRACEFIELD
Command in the Edit window
TRACEFIELD
Command in the Edit window
You can also use the Edit window to change the tracefield's name, display message, and current value.
The Edit window command line for a TRACEFIELD command looks like this:

TRACEFIELD command in Command mode
Display - This toggle field controls whether to display the Trace Field dialog box during execution. This field switches between YES and NO.
Report - This toggle field controls whether to display the name of the trace and its value in the measurement report. This field switches between YES and NO.
Display Message - This field holds the message that appears for the tracefield during execution.
Name - This field holds the name of the tracefield.
Value - This field holds the current value of the tracefield.
If you select Source as None, you can type or edit the trace name, display message, and value.
If you select Source as Q-DAS, the Name becomes a drop-down list. From the drop-down list, select the trace name.
If you have one row with a single value, you can type or edit the value.
If you have multiple rows each with its own value, you can select a value from a list of available values.

You can use variables in a TRACEFIELD command’s fields under these conditions:
You must define the variables you want to use earlier in the routine above any TRACEFIELD commands.
You must type the variable names into the corresponding fields in the TRACEFIELD command in the Edit window or in the dialog box.
You can type a variable into all the fields (name, message, or value) if Source is set to None in the dialog box. If Source is set to Q-DAS, you can type variables only in the value field. Also, you can type a variable for a value only if the TRACEFIELD command contains a single value.
Use the GETTRACEVALUE() function to read a value from a TRACEFIELD command in the measurement routine. For information on this and all string functions, see "String Functions" in this documentation.
Here's an example of variables in a TRACEFIELD command after Source is set to None in the dialog box:
ASSIGN/V1="OPERATOR"
ASSIGN/V2="TYPE THE OPERATOR NAME"
ASSIGN/V3="Sam"
TRACEFIELD/DISPLAY=YES,REPORT=NO,DISPLAY MESSAGE=V2 ; V1 : V3
The
Trace Field Dialog Box During Execution
For a single value, the Trace Field dialog box displays a box to type or edit a value:
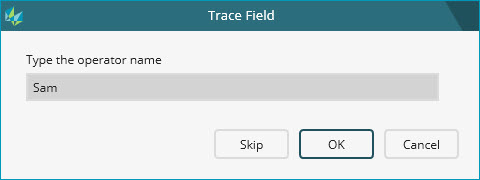
Single Value Trace Field dialog box during execution
For multiple values, the Trace Field dialog box displays a list to select a value.
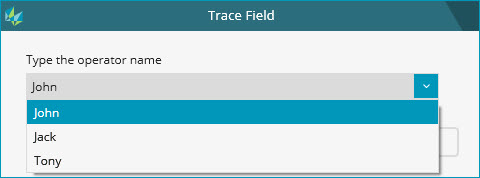
Multiple Value Trace Field dialog box during execution
Execution Example - A Single TRACEFIELD Command
Example of a single tracefield
During execution, PC-DMIS displays a single TRACEFIELD command with the usual Trace Field dialog box:
Single Trace Field dialog box during execution
Skip - This button skips the tracefield and does not use the value. If the tracefield is mandatory, this button is not available.
OK - This button accepts the values for any executed tracefields.
Cancel - This button cancels the execution of the PC-DMIS measurement routine.
Execution Example - Multiple Consecutive TRACEFIELD Commands
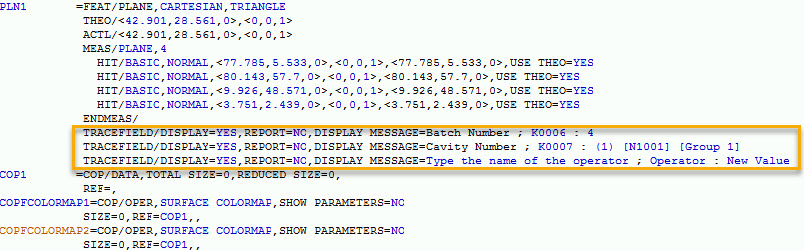
Example of three consecutive TRACEFIELD commands
During execution, PC-DMIS combines multiple consecutive commands so that they appear in a single Trace Field dialog box. This combination of commands can save you time because PC-DMIS collects the information from a single dialog box instead of a dialog box for each command:
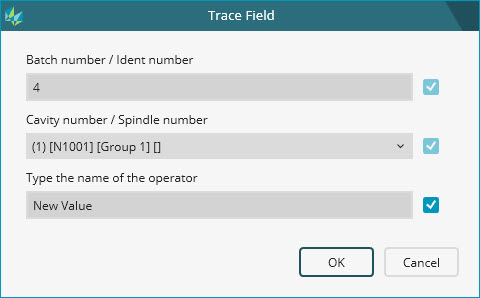
Multiple Trace Field dialog box for consecutive tracefields
Check Box - The blue check boxes allow you to include or skip a tracefield during execution.
If you select any check boxes, PC-DMIS executes those tracefields.
If you clear any check boxes, PC-DMIS skips those tracefields and does not use those values. If a tracefield is mandatory, the check box is not available for that tracefield.
OK - This accepts the values for any executed tracefields.