Defining a Rule in the Rule Tree Editor
To use the Rule Tree Editor
dialog box to define a rule, follow this procedure:
Select File | Reporting
| New | Report Template to access the Report Template Editor.
Add a TextReportObject, CadReportObject, or a Label object onto the template.
Right-click on the object. A Properties
dialog box appears.
Select the Rules Tree
property from the Properties dialog box.
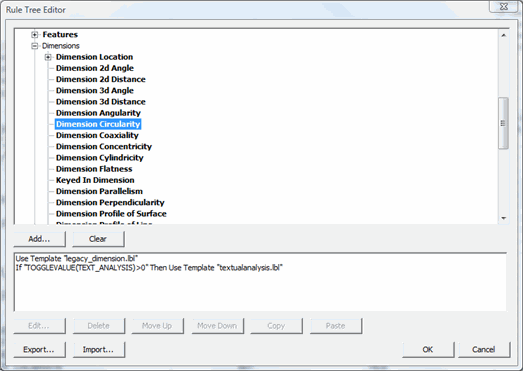
The Rule Tree Editor 
 dialog
box appears. The dialog box displays a list of
various items that make up a measurement routine. To expand many of
these items, click on a plus symbol (+) to view more specific items
or commands. Some items exist on their own and aren't inside of any
expanding lists; these items include:
Top of First Page in
Section - You can use this item to select a label or text
expression to display at the top of the first page in the current
section of your Report window.
Bottom of Last Page
in Section - You can use this item to select a label or
text expression to display at the bottom of the last page of the
current section.
File Header -
You can use this item to select a label or text expression to
display in the place of the usual report's file header of PART
NAME, REV NUMBER, SER NUMBER, and STATS COUNT. The File Header
label or text appears on the first page in the current section
of your report.
Define the conditions to be met.
From the list of
items, find an item that you want to define as a condition.
Select the item,
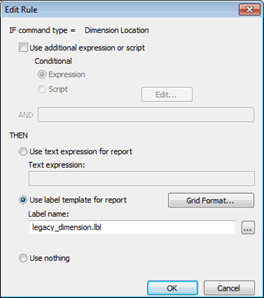
and click Add. The Edit
Rule 
 dialog
box appears.
If you want to define
another condition, you can choose either a reporting language expression
or a BASIC script as your condition. To do this, select the Use Additional Expression or Script check box,
and then in the Conditional area, select
either the Expression or Script
option.
If you select Expression, type the expression for your condition
into the Conditional Expression box. For
example, to create a rule for a measured circle, you can test any
of the circles data type field values to control whether or not to
display a label. Suppose you only want to display a label if the measured
circle has less than four hits. In the Conditional
Expression box, you would type:
N_HITS
< 4
Then, if this condition
evaluated to TRUE, PC-DMIS would use the associated label. Note that you
don't need to include the entire IF expression statement. The IF statement
is already understood and evaluated in this box.
If you selected
Script, click the Edit
button to create your BASIC script. A VBS Mini-editor
appears where you can type your code. Create your script inside this
code editor. The script must return TRUE for the condition to be met.
When finished, right-click and select Check Syntax.
Click OK when finished. PC-DMIS automatically
stores the script with the defined rule.
If the rule ever gets deleted,
your script is lost. Store your script in a separate text file if you
are concerned about it getting deleted.
Define a label, an expression, or nothing at
all to display if the condition or conditions defined are met. With
the Edit Rule dialog box open, you can choose
one of the following:
When you have filled out the Edit
Rule dialog box, click OK. PC-DMIS
places the item from the list in a boldface font and inserts the rule
for that item at the bottom of the Rule Tree Editor
dialog box.
Organize your rules. You can have as many rules
as you want for a given command type. If you have more than one rule,
PC-DMIS will evaluate the rules in the order that they appear. You
can change the evaluation order by selecting a rule and clicking Move Up or Move Down
in the Rule Tree Editor dialog box.
You can copy and
paste rules from one item to another item, to multiple items, or to
an entirely different tree by using the Copy
and Paste buttons. See "Copying
and Pasting Rules".
You can remove rules
from an individual item by clicking Delete
or Clear. If you want to remove the rules
for multiple items, you can select them and click Clear.
See "Clearing Rules"
Click OK to save
the changes you made to the Rule Tree Editor.
Test the rule.
Save the report template.
Apply the report template to the report
data by using the Reporting toolbar
on the Report window.
Execute the measurement routine.
Be aware that a rule assigned to a child element always
overrules a rule assigned to a parent element. Also, a rule assigned to
a parent node applies to each child element of that node that does not
contain its own rule.
You must have an active Internet connection to see this video.
Related
Topics:
About Report Expressions
CadReportObject
GridControlObject
Label Object
TextReportObject
Using the Table Format Command
 dialog
box appears. The dialog box displays a list of
various items that make up a measurement routine. To expand many of
these items, click on a plus symbol (+) to view more specific items
or commands. Some items exist on their own and aren't inside of any
expanding lists; these items include:


