Step
1: Preparing the Work Environment
Step
1: Preparing the Work EnvironmentThis topic walks you through a basic tutorial that will create a simple form with some interactive dialog box controls that, when executed, will allow you to select a user name from a list and then choose to measure only certain features. The information you select will then appear in a final report.
While you can certainly duplicate aspects of this by using certain Edit window commands, this tutorial will give you an idea of what's possible with the Form Editor, some imagination, and a little programming skill.
This tutorial uses files you created in the "Creating a Custom Report Template" and "Creating Label Templates" tutorials. If you haven't already done so, complete those tutorials first.
 Step
1: Preparing the Work Environment
Step
1: Preparing the Work Environment
In this tutorial you will switch between the Form Editor and the Edit window, so first prepare the Edit window.
Right-click on your Edit window and select Docking View from the shortcut menu to undock it.
Select the maximize button so that it fills the screen.
Place the Edit window into Command mode.
Select File | Reporting | New | Form Report to open the Form Editor.
To hide any unused toolbars, right-click on the toolbar area and remove them.
To hide any unused PC-DMIS windows, select the open window from the View menu. Keep the Edit window open.
To maximize the Form Editor, click the
maximize
button![]() in the upper right corner of the editor's
window. You should see the words "FORMS" on the background
of the editor. Your Form Editor should now look something like
this:
in the upper right corner of the editor's
window. You should see the words "FORMS" on the background
of the editor. Your Form Editor should now look something like
this:
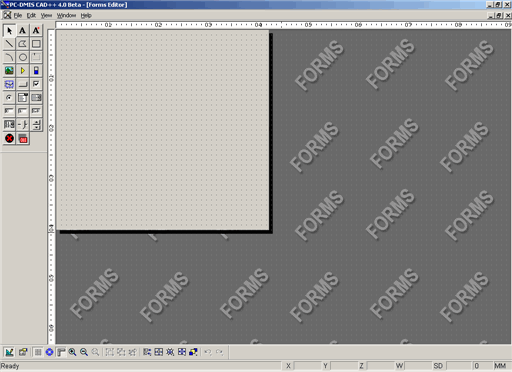
Form Editor
When working with the Form Editor, you may find it helpful to hide your usual PC-DMIS toolbars and windows, thereby freeing up some screen space. If you work frequently with this editor, you may want to create a stored screen layout for your template. For information on layouts, see the "Window Layouts Toolbar" topic in the "Using Toolbars" chapter.
Drag the TheFrame/TheView's gray background so that it is 5 inches wide by 6 inches tall.
Add a Border object, and drag the border so that it fits just within the form's area. Set the border's properties so that it has a LineWidth value of 3 and a ForeColor of dark blue (0.0.128).
Add a Bitmap object in the top of the form. The Bitmap Dialog appears. Use the Load button to navigate to a bitmap file of your choice, such as a corporate logo. Size and position the bitmap so that it's within the top 1.5 inches of the form.
Add a RadioButton object under the Bitmap object. Access the RadioButton's properties, and click on the ListItems value. The List Choices dialog box appears. This dialog box lets you create a list of option buttons for the object.
Select the existing RadioButton1 item from the List Choices box. In the Name box, change the name to "CIRCLE 1". The index Value should already display 0.
Click the Add
button to add three more items. Then change the newly added
items to read "CIRCLE 2", "CIRCLE 3",
and "CIRCLE 4". They should have index values of
1, 2, and 3 respectively. The List Choices
dialog box, should look like
this:

List Choices dialog box, showing four options with four index values ranging from 0 to 3.
Click OK when finished.
Rename the RadioButton object by changing the (ObjectCode) value from "RadioButton1" to "optMeasure".
Add a Frame object and drag it around your RadioButton object. Change the Frame's Text property to read "Select What to Measure".
Add an EditBox object to the right of the RadioButton object, and rename it from "EditBox1" to "txtMeasure".
Add a Text object (Text1) under the RadioButton object, and set its Text property to read "Select User:".
Add a ComboBox to the right of the Text object, and rename it from "ComboBox1" to "cboUsers". This control will contain a list of users.
Click on the ListItems value to add the list of users. This accesses the List Choices dialog box again.
Click Add. PC-DMIS inserts "(None)" under List Choices.
Change the name of the first item in the list from "(None)" to "[Select a User]", and give it an index Value of 0.
Continue to use this dialog box as you did before to add five or six user names. This tutorial used "Bob", "Allen", "Mary", "Shelly", "Jared", and "Kurt".
Use the Up or Down buttons
as desired to change where an item appears in the list. The
dialog box, when finished, should look something like this:
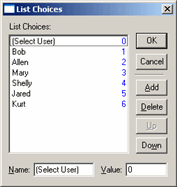
List Choices dialog box showing a list of user names for the ComboBox
Click OK. Your ComboBox object now contains those list items.
Add an EditBox object to the right of the ComboBox, and rename it from "EditBox2" to "txtUser".
Add another Text object (Text2) under the object that reads "Select User", and set its Text property to read "Type a Report Description:".
Add another EditBox object to the right of the above Text object, and rename it from "EditBox3" to "txtDescription".
Add a Button object to the bottom of the form, and rename it from "Button1" to "cmdContinue". Change its Text property to read "&Continue". The ampersand symbol lets you define whatever character follows it as a shortcut character to be used with Alt. So, pressing Alt + C on your form in Run Mode will act as if you clicked the Continue button.
Select File | Save to save the form. Give it the name "TestForm.Form" and save it in a directory of your choice.
Press Ctrl + E to test your form in run mode. There's no code tied to any of the controls so nothing much happens if you click on anything, but you'll add that next. When finished, press Ctrl + E again to return to edit mode.
In this step, you have completed the basic form,
adding various controls and assigning items to lists. It should look
something like
this:
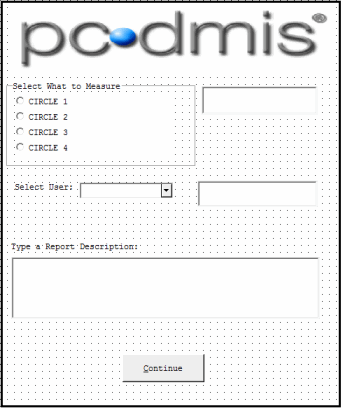
Form with the various form controls added
Step
3: Add Code to the RadioButton Control
Select the RadioButton object, optMeasure, and access its properties.
Click on the EventChange event. The VBS Mini Editor appears. This small code window lets you type Visual BASIC code statements that will run whenever you select a new value from the list of option buttons.
In the code window, type this code:
Dim intIndex As Integer
intIndex=optMeasure.Index
Select Case intIndex
Case 0
txtMeasure.Text="Circle 1"
Case 1
txtMeasure.Text="Circle 2"
Case 2
txtMeasure.Text="Circle 3"
Case 3
txtMeasure.Text="Circle 4"
End Select
Click OK. The mini editor closes.
Select File | Save to save the form.
Test your report by pressing Ctrl + E and entering run mode. Select a feature to measure.
This code runs when you select a feature to measure from the list. It looks at what gets selected from the list of option buttons, and sets the Text property of txtMeasure to display a text string of "CIRCLE 1", "CIRCLE 2", and so on. Press Ctrl + E to exit run mode and return to edit mode.
Step
4: Add Code to the ComboBox Control
Select the ComboBox object, cboUsers, and access its properties.
Click on the EventChange event. The VBS Mini Editor appears.
In this code window, type this code:
txtUser.Text=cboUsers.TextValue
Click OK. The mini editor closes.
Select File | Save to save the form.
Test your report by pressing Ctrl + E and entering run mode. Select a user.
This code runs when you select a user from the list. It looks at the text value of the selected list item, and sets the Text property of txtUser to display a text string of the selected user. Press Ctrl + E to exit run mode and return to edit mode.
Step
5: Add Code to the Continue button
Select the Button object, cmdContinue, and access its properties.
Click on the EventClick event. The VBS Mini Editor appears.
In this code window, type this code:
If cboUsers.Value>0 And Len(txtDescription.Text)>0 And Len(txtMeasure.Text)>0 Then
TheView.Cancel
Else
MsgBox "Please fill out the entire form before continuing."
End If
Click OK. The mini editor closes.
Select File | Save to save the form.
Test your report by pressing Ctrl + E and entering run mode. Click the Continue button.
This code runs when you click the Continue button. It checks to make sure the form is all the way filled out, and if it is, it closes the Form Editor. If not, it displays a message telling the user to fill out what's missing.
The Len ( ) function tests the length (or the number of characters) for the text string in the edit boxes, making sure something is there.
The cboUsers.Value > 0 code checks to make sure a user name gets selected from the list.
Step
6: Assign Edit Window Variables to Hold Form Properties
Now that you have defined your form, you need a way to pass data back and forth, between the Edit window and the form.
If you haven't already done so, save your form.
From the Window menu select Edit Window to make the Edit window come to the front.
Make sure it is in command mode.
After each Circle feature insert a Location dimension for that circle.
Near the top, before the Circle features, define variables that you will assign to work with the form, by typing this code in the Edit window before the measured Circle features:
ASSIGN/STR_DESCRIPTION=""
ASSIGN/STR_USER=""
ASSIGN/STR_MEASURE=""
Place your cursor immediately after these statements, and select Insert | Report Command | Form. An Insert Form dialog box appears. Navigate to where you stored "TestForm.FORM", select it, and click Open.
PC-DMIS inserts a FORM/FILENAME
command block into the Edit window with a pathway to the selected
form file. This command, when marked and executed, will run the
form. It then waits until the form is closed before continuing
execution of the Edit window. 
Notice that this command contains a PARAM/= statement, or a "parameter". These parameters let you pass values back and forth between the PC-DMIS Edit window variable and the form control properties.
Click just before the left side of the
equals sign in the PARAM/=
statement, and type "TXTDESCRIPTION.TEXT".
Click on the right side of the equals sign, and type "STR_DESCRIPTION".
Press Enter. Another PARAM/=
statement appears.
Remember that txtDescription is the name you gave the EditBox object in your form that will hold a user-entered description of the report.
During execution, the Text property of txtDescription will initially take the value of whatever STR_DESCRIPTION holds. In this case, it would take an empty string. After you close the form, it passes whatever value the form has back into STR_DESCRIPTION.
Continue to define parameters in this way for both the STR_USER and STR_MEASURE variables, tying them to the txtUser and txtMeasure objects' Text properties respectively.
Save your changes to the Edit window. When finished, your FORM/FILENAME command block, should look something like this.
CS7 =FORM/FILENAME=D:\PARTPROGRAMS\TESTFORM.FORM
PARAM/TXTDESCRIPTION.TEXT=STR_DESCRIPTION
PARAM/TXTMEASURE.TEXT=STR_MEASURE
PARAM/TXTUSER.TEXT=STR_USER
PARAM/=
ENDFORM/
Step
7: Add Edit Window Conditional Code to Control Measurement
When you created your form, you created a list of option buttons (using the RadioButton object) to control what exactly gets measured. You now need to add conditional statements into the Edit window too, so that the proper feature gets measured according to what gets selected from the form.
In the Edit window, place your cursor right before the first CIR1 feature and press Enter. Your cursor should be in a blank line above the CIR1 feature.
Select Insert | Flow Control Command | Control Pairs | If / End If. PC-DMIS inserts an IF / END IF conditional statement into the Edit window:
IF/0
END_IF/
Define the condition. Highlight the default value of 0 and type:
STR_MEASURE=="Circle 1"
Press ENTER.
Select the entire CIR1 feature and the location dimension following it, and select Edit | Cut. Then select Edit | Paste to move it onto a blank line after the IF/STR_MEASURE == "Circle 1" line but before the END_IF/ line. Your first conditional block should look like this:
IF/STR_MEASURE=="Circle 1"
CIR1 feature goes here...
Location dimension goes here...
END_IF/
Remember that STR_MEASURE, after execution, will hold the value of the txtMeasure object's Text property. According to the form code, this will be either:
"Circle 1", "Circle 2", "Circle 3", or "Circle 4".
This first line checks the variable value of STR_MEASURE and if it matches the string value of "Circle 1" then it will measure the CIR1 feature. If not, it will skip and go to whatever follows the END_IF/ statement.
Continue repeating the above steps, defining conditional statements for the other circle features as well. When finished, your Edit window code should look something like this:
ASSIGN/STR_DESCRIPTION=""
ASSIGN/STR_USER=""
ASSIGN/STR_MEASURE=""
CS7 =FORM/FILENAME=D:\PARTPROGRAMS\TESTFORM.FORM
PARAM/TXTDESCRIPTION.TEXT=STR_DESCRIPTION
PARAM/TXTMEASURE.TEXT=STR_MEASURE
PARAM/TXTUSER.TEXT=STR_USER
PARAM/=
ENDFORM/
IF/STR_MEASURE=="Circle 1"
CIR1 =FEAT/CIRCLE...
DIM LOC1 LOCATION OF CIRCLE CIR1
END_IF/
IF/STR_MEASURE=="Circle 2"
CIR2 =FEAT/CIRCLE...
DIM LOC2 LOCATION OF CIRCLE CIR2
END_IF/
IF/STR_MEASURE=="Circle 3"
CIR3 =FEAT/CIRCLE...
DIM LOC3 LOCATION OF CIRCLE CIR3
END_IF/
IF/STR_MEASURE=="Circle 4"
CIR4 =FEAT/CIRCLE...
DIM LOC4 LOCATION OF CIRCLE CIR4
END_IF/
Now, you need to apply some finishing touches. First, you need to tell PC-DMIS to send the values of our form to the final report in the Report window by using report comments. Then you need to make some objects invisible on the form.
In the Edit window, type these commands immediately following the FORM/FILENAME command block.
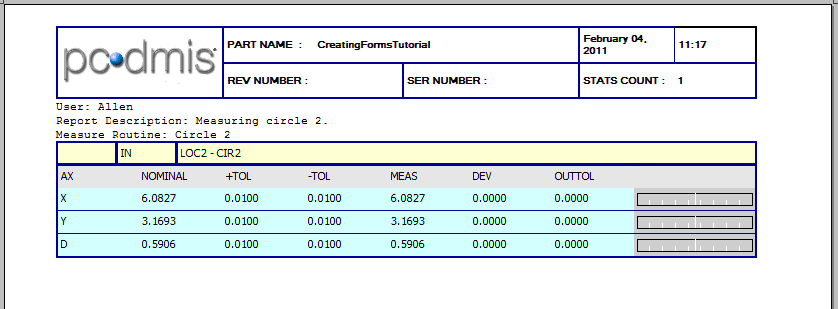
COMMENT/REPT,
"User: "+STR_USER
COMMENT/REPT,
"Report Description: "+STR_DESCRIPTION
COMMENT/REPT,
"Measure Routine: "+STR_MEASURE
After you insert a PC-DMIS comment, to type additional PC-DMIS commands in Command Mode, you must first press Enter twice after the COMMENT command. This tells PC-DMIS that you no longer want to add text to the comment but are ready to add a new command.
Select Window | Form Editor to go back to the Form Editor.
Right-click to access the Properties dialog box. Select txtMeasure from the drop-down list. PC-DMIS selects the object.
Click Advanced and set the Visible property to NO.
Select txtUser from the drop-down list. PC-DMIS selects the object.
Click Advanced and set the Visible property to NO. Since a user doesn't need to see these values and the only reason we used them was to pass a value back to PC-DMIS, setting this property to NO makes these objects invisible during execution.
Save your form.
Close the Form editor.
Step
9: Execute the Measurement Routine
Select View | Report Window and use the Template Selection Dialog toolbar icon to set the report to use the default standard report template, TextOnly.rtp.
Return to the Edit window. Mark the entire Edit window, save your measurement routine, and then select File | Execute to test your measurement routine.
When PC-DMIS reaches the FORM/FILENAME command, it will run the form and pause execution until you finish filling it out.
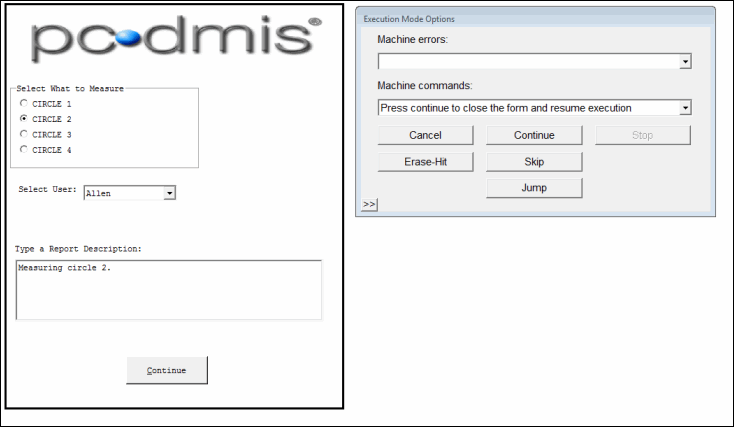
Fill out the form and click the Continue button. PC-DMIS passes the values from the form back into the PC-DMIS variables.
The conditional statements check the value of the STR_MEASURE variable and execute the appropriate Circle feature accordingly.
PC-DMIS prints the report comments and the measured results for the measured feature to the Report window.