You can also access the Temperature
dialog box from the QuickMeasure toolbar.
Click the Gage drop-down arrow, and then
click the Temperature  button.
You can create a Temperature Gage command that reads the temperature of the X scale, Y scale, Z scale, and part without starting temperature compensation.
Temperature Gage Command
The Temperature Gage command reads the temperature of the X scale, Y scale, Z scale, and part.
To create a Temperature Gage command:
Select Insert | Gage | Temperature to open the Temperature dialog box.
You can also access the Temperature
dialog box from the QuickMeasure toolbar.
Click the Gage drop-down arrow, and then
click the Temperature  button.
Complete the Properties tab and Reporting tab.
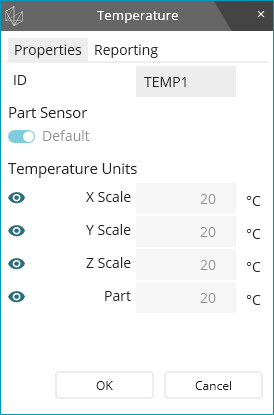
Use the Properties tab to set the ID, sensor numbers, and other parameters.

Properties tab - Temperature dialog box
ID box - Type the ID of the Temperature Gage command.
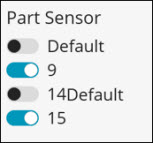
Part Sensor option - Usually, a machine is equipped with only one part temperature sensor. This sensor appears as Default. You cannot cancel the selection of this sensor. If your machine is equipped with multiple part sensors, they appear in this area. For example:

Part Sensor area
Select the sensor or sensors that are connected to the part being measured. Ensure that you select the correct sensor number. If you select multiple sensors, PC-DMIS uses the average of two measured values.
Temperature Units area - The X Scale, Y Scale, Z Scale, and Part boxes display the current temperatures as measured. You cannot change the values. The temperature units and the default sensor number are as selected in Edit | Preferences | Temperature Compensation Setup.
Show
in Dimension/Hide in Dimension - This button shows ( ) or hides (
 ) the
temperature units in the command. You need to show at least one temperature
unit or axis.
OK button - To save your settings and insert the Temperature Gage command into the Edit window, click OK.
Cancel button - To close the dialog box without applying any changes, click Cancel.
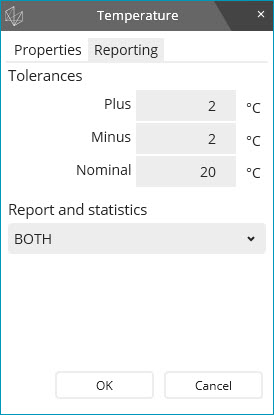
Use the Reporting tab to set tolerances and the type of report output.

Reporting tab - Temperature dialog box
Tolerances area:
Plus box - Type the plus tolerance. You can change the plus tolerance for each axes and/or part.
Minus box - Type the minus tolerance.
Nominal box - Type the nominal value. The default nominal temperature is 20°C.
The same nominal and tolerance values apply to scale and part temperatures.
If necessary, you can change the nominal temperature and tolerances for each axes and/or part in the Edit window.
Report and Statistics area - In the list, choose how to send the output of the command when it is executed:
STATS - Sends the output to a statistical file.
REPORT - Sends the output to an inspection report.
BOTH - Sends the output to both an inspection report and statistical files.
NONE - Does not send the output anywhere.
Edit Window
The Edit window displays the command as a dimension.
It appears in Summary mode as shown below:

Summary mode
It appears in Command mode as shown below:

Command mode
The command appears according to the format statement in your measurement routine.
If the controller is equipped with only one part temperature sensor, the PART SENSOR NUM field appears in the Edit window. If your controller is equipped with multiple part sensors, and you selected a part sensor number in the Part Sensor area in the Temperature dialog box, the number appears in the Edit window.
Expressions
The Temperature Gage command supports expressions, like in this example:
ASSIGN/V1=READTEMP1.M.Meas
To create an expression:
Press F2 on the ASSIGN statement in the Edit window to open the Expression Builder dialog box.
From the Expression Element Type list, select "Temperature". All of the Temperature Gage commands that are in the measurement routine appear in the ID list.
From the Extension list, select the temperature of the X, Y, Z, or M (part). Select them as required to build an appropriate expression.
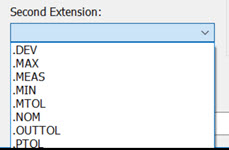
From the Second Extension list, select the type of value you want to store, such as deviation, maximum, measured, and so forth.

For details about expressions, see "Using Expressions and Variables". For details about the Expression Builder dialog box, see "Creating Expressions with the Expression Builder".
Temperature Compensation Dimensioning
The Temperature Compensation command can report the temperature of the scale and part that you are using for compensation. For details, see "Temperature Compensation Dimensioning".
Offline Mode and Non-Hexagon CMM
Temperatures cannot be read in Offline mode. Therefore, in Offline mode, the measured value shows as 20 °C.
Similarly, the temperature shows as 20 °C if the controller of the machine to which you are connected does not support defining and reading the temperature sensor.