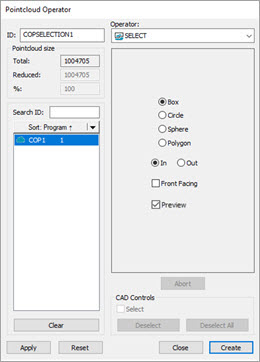
Pointcloud Operator dialog box - SELECT Operator
To apply the SELECT operation to a pointcloud, click
Select Pointcloud
( ) from
the Pointcloud toolbar, or select Operation
| Pointcloud | Select. By default, the software uses the Polygon option when you click the Select
Pointcloud button.
) from
the Pointcloud toolbar, or select Operation
| Pointcloud | Select. By default, the software uses the Polygon option when you click the Select
Pointcloud button.
The SELECT operation selects a subset of data contained in a COP command.
PC-DMIS includes only a subset of the pointcloud data strictly inside the polygon selection when you select the In option.
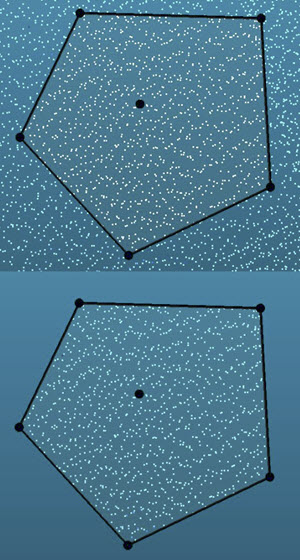
Pointcloud selection showing data using the In option:
Top image - The initial selection
Bottom image - The result after you click the Apply button
PC-DMIS includes only a subset of the pointcloud data strictly outside the polygon selection when you select the Out option.
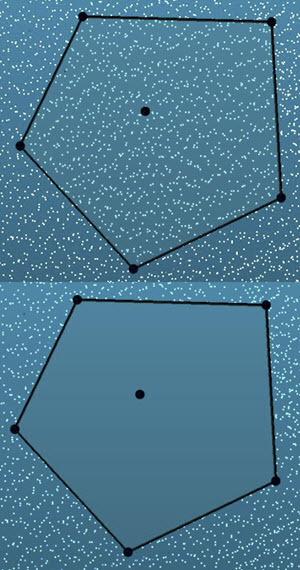
Pointcloud selection showing data using the Out option:
Top image - The initial selection
Bottom image - The result after you click the Apply button
To select a region of points:
From the ID list of commands, select the Pointcloud ID that you want to apply the selection.
From the Pointcloud Operator dialog box, choose a selection method:
Use Ctrl + left-mouse click when you make the selection. This snaps the center of the selection onto the Pointcloud.
Also, it may be helpful to turn off the Show Graphic Window as Solid option from the Graphic View toolbar (View | Toolbars | Graphic View) so you can see the pointcloud.
In the Graphic Display window, click and drag an area to select a portion of the pointcloud. The type of area you select depends on the selection method made in Step 2.
You can change the outline, position and depth of the selection:
To change the outline of a box, circle or sphere, click an edge and drag. For a polygon, click and drag a vertex.
To rotate a box selection, click a corner vertex and drag.
To move a selection's position, click and drag the center control point.
By default, the box, circle and polygon selections are 3D, extending through the pointcloud, normal to the selection's view. You can click and drag one of the center depth points to change the depth of the selection.
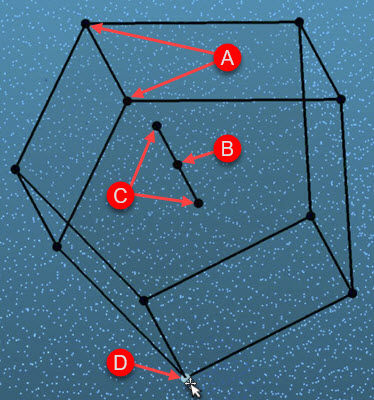
Polygon region showing:
A - Region boundary points
B - Region center control point
C - Region center depth points
D - Hover over a vertex on a polygon selection (or an edge for box, circle or sphere selections) until it is highlighted, and then click and drag it to change the outline of the selection
If you want to keep the points inside the selection, from the Pointcloud Operator dialog box, click In. If you want to keep the points outside the selection, click Out.
Click the Front Facing check box if you want to keep only the points that are front facing in the selection view. For details, see "Pointcloud Select - Front Facing".
The software selects the Preview check box by default. This allows you to see the Pointcloud when you select a region. You may want to uncheck the box so the selected Pointcloud data are not highlighted. This may be helpful if you have a very large Pointcloud object and showing the selected pointcloud data affects performance.
After clicking the necessary points in the Graphic Display window, click the Apply button to perform the selection. PC-DMIS displays the points inside or outside the selected domain in the Graphic Display window.
When you’re finished, click Create. PC-DMIS inserts a COP/OPER,SELECT command into the Edit window.
If you want to select the complement data instead, you can use the BOOLEAN operator to do that. For information on the Complement option inside BOOLEAN, see the "BOOLEAN" topic.
Click Create to insert a COP/OPER,SELECT command into the Edit window.
PC-DMIS creates the Pointcloud SELECT command in the CAD coordinate system. The examples below describe the values for each selection method.
A 0 (zero) depth value means infinite depth, cut through the entire pointcloud in the selection view.
More:

 COPSELECT
Box Example
COPSELECT
Box Example