Create a measurement routine in PC-DMIS, or open an existing one.
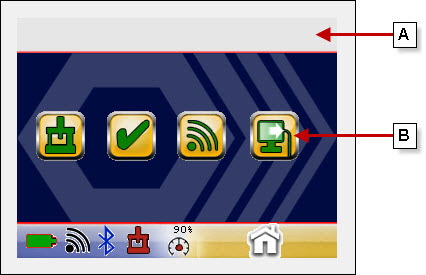
Tap the upper banner on any screen on the UJB,
or the External Host Interface icon ![]() on the Home
Screen:
on the Home
Screen:
To enable the UJB to communicate with the PC-DMIS measurement routine, do the following:
Create a measurement routine in PC-DMIS, or open an existing one.
Tap the upper banner on any screen on the UJB,
or the External Host Interface icon ![]() on the Home
Screen:
on the Home
Screen:

UJB Home Screen
A. Upper banner
B. External Host Interface icon
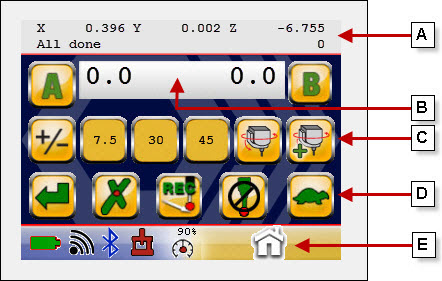
The current screen on the UJB will change to the PC-DMIS Host Interface screen and display information about the measurement routine that is open in PC-DMIS.
For example:

Example of PC-DMIS Host Interface screen
A. Probe
Readout window
B. Wrist Angle
window
C. PC-DMIS
host interface icons
D. UJB operational
icons
E. UJB
navigation bar icons
The PC-DMIS Host Interface screen can also display standard application icons that are equivalent to Microsoft® Windows® buttons and icons.
If PC-DMIS is not running, this message appears on the screen:
PC-DMIS is not running. Please start
PC-DMIS to use these pages.
To resolve this message, open PC-DMIS and create a measurement routine,
or open an existing one.
If PC-DMIS is running, but no measurement routine is open, this message appears on the screen:
NO ACTIVE MEAS ROUTINE.
To resolve this message, create a measurement routine in PC-DMIS, or open an existing one.
The Probe Readout window displays the same information that appears in the Probe Readout window in PC-DMIS.
For example:

Example of Probe Readout window
The top row displays the current XYZ probe position. The bottom row displays the last message that appeared in the Probe Readout window. It also displays the hit count (the current number of hits taken).
The Wrist Angle window displays either the current wrist angles of the probe or the wrist angles that you are in the process of selecting.
Icon |
Description |
|
A Wrist Angle icon: Selects the A wrist angle to modify. For example, to modify it by 7.5 degrees, tap the A Wrist Angle icon and then the 7.5 icon. |
|
B Wrist Angle icon: Selects the B wrist angle to modify. For example, to modify it by 45 degrees, tap the B Wrist Angle icon and then the 45 icon |
|
Degree icons: Change the A or B wrist angle's increment between the starting and ending angles by the degree indicated on the icon. The degrees that appear are based on the type of wrist. For example, the 7.5, 30, and 45 icons reflect a wrist angle that uses 7.5 degree increments. You can tap the icons as many times as needed. For example, you can tap the 45 icon twice to change the wrist angle 90 degrees. You can also combine degrees. For a negative degree, a "-" will appear before the number on the icon. |
|
Positive/Negative icon: Toggles between a positive and negative value on the degree icons that you can select next. For example, if the current wrist angle is 0 degrees:
If the current wrist angle is 15 degrees:
|
|
Warning: To prevent damage to the probe, ensure that it is clear of any obstacles before you tap this icon. Probe Rotation icon: Rotates the probe to the selected wrist angle. It does not insert the angle into the measurement routine. If you are sure that the selected wrist angle is correct, you can use the Probe Rotation and Insertion icon instead of the Probe Rotation icon. |
|
Warning: To prevent damage to the probe, ensure that it is clear of any obstacles before you tap this icon. Probe Rotation and Insertion icon: Rotates the probe to the selected wrist angle and then inserts the angle into the measurement routine. |
Icon |
Description |
|
Done icon: Accepts any hits you took and guesses what the feature type. |
|
Delete Point icon: Deletes the last hit. |
|
Record Move-Point icon: Records the latest current probe position and inserts a Move command into the Edit window in PC-DMIS. |
|
Active Probe icon: Indicates that the probe is active. This icon acts as a toggle to change the probe between active and inactive. |
|
Inactive Probe icon: Indicates that the probe is inactive. |
|
Mode icon: Indicates that the UJB is in slow mode (green) or fast mode (grey). |
For descriptions of the navigational icons, refer to the Universal Jogbox User's Manual.
For complete descriptions, refer to the documentation provided with your Microsoft Windows operating system.
Icon |
Description |
|
OK icon |
|
Cancel icon |
|
Abort icon |
|
Retry icon |
|
Ignore icon |
|
Yes icon |
|
No icon |