(This item pertains to the Probe Utilities dialog box, accessible through Insert | Hardware Definition | Probe.)
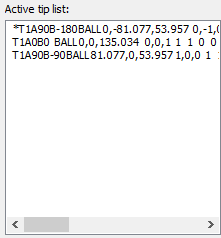
PC-DMIS is capable of storing data that describes a large number of probe tips. This data includes the probe tip's ID, rotation, type, location, direction, diameter and thickness, date and time of calibration, and any non-calibrated tips. These are all stored inside the Active tip list.

Active tip list
The list can display up to 32767 probe tips. This number may be limited by the amount of disk space available on your system.
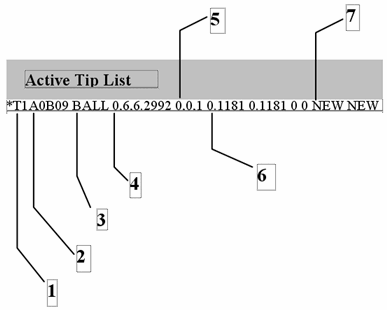
PC-DMIS describes a probe according to the following criteria:

Tip List Description
1.
 TIP ID#
2.  Tip
Rotation
3.  Tip
Type
4.  X,Y,Z
Location
5.  I,J,K
Direction
6.  Diameter
and Thickness
7.  Date
and Time
* (asterisk)
-  Noncalibrated
Tip
Adding Tips to the List
You can use the Add Angles button to define new tips and add them to the list. To do this, see the "Add Angles" topic.
Editing Tip Data
Highlight the desired active tip in the Active tip list.
Click the Edit button to show the Edit Probe Data dialog box.
Modify the displayed values.
Click OK to save your changes.
Non-calibrated tips have an asterisk before their Tip ID # in the Active tip list.
Setting the Calibration Order
The calibration order is determined by the order in which the tips are chosen from the list box.
To set the calibration order:
From the Probe Utilities dialog box, click Measure to show the Measure Probe dialog box.
From the Measure Probe dialog box, Calibration mode area, select the User Defined option. (See the "Measure" topic.)
Hold down the Ctrl key on the keyboard.
With your left mouse button, select the tips from the Active tip list for calibration. A number representing the index of the tip measurement order appears next to each Tip ID as you select it.
If you do not select any tips, PC-DMIS prompts if you want to measure all tips.
Selecting a Tip to Use
You can define a specific probe tip to use in your measurement routine in these ways:
Type TIP in the Edit window's Command mode and press the Tab key on your keyboard.
Select the probe tip from the list on the Settings toolbar.
The Edit window command line for a sample tip would
read:
TIP/T1A0B0, SHANKIJK=0, 0, 1, ANGLE=0
Until PC-DMIS encounters another TIP command in the measurement routine flow, it uses that tip.
Deleting a Tip or Wrist Angle
To delete one or more tips from the Active tip list:
Select the item or items to be removed.
Click the Delete button.
PC-DMIS also allows specific wrist angles to be removed from the Active tip list. If you delete a tip or probe head, PC-DMIS also deletes all related wrist angles from the file.
This option deletes the tip from the Active tip list and removes it from the file of tips known to the system.