 )
on the Report window's Reporting
toolbar opens and closes a pane of thumbnail images so that you can
preview the report.
)
on the Report window's Reporting
toolbar opens and closes a pane of thumbnail images so that you can
preview the report.The Preview Pane button ()
on the Report window's Reporting
toolbar opens and closes a pane of thumbnail images so that you can
preview the report.
Each thumbnail image on the pane corresponds to a page on the report.
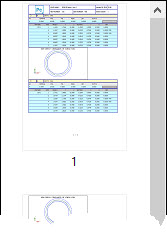
A Sample Preview Pane
When the pane is open, you can click on a thumbnail image to go to that report page.
Entering Edit Mode for Custom Reports
To perform certain operations with the preview pane, you need to place your custom report into edit mode. This accesses a slimmed down version of the Custom Report Editor. This lets you edit a report without leaving the usual PC-DMIS menu structure. You can do this through either of these options:
Click Custom Report selection
dialog ( ) and then click Blank
Report and then Open.
) and then click Blank
Report and then Open.
Click Edit report
( ).
).
For more complex edits, you can still use the Custom Report Editor.
Adding and Deleting Pages in Custom Reports
In edit mode, you can add or delete pages on your custom report.
To add a page, click the large plus button ( ) after the last thumbnail
image; or right-click on any thumbnail image and select Add
Page.
) after the last thumbnail
image; or right-click on any thumbnail image and select Add
Page.
To delete a page, either select a thumbnail image and press Delete on your keyboard; or right-click on the thumbnail image and select Delete Page. You must always have at least one page in your report.
For more information on custom reports, see "Creating Custom Reports" in this chapter.
Ordering Pages in Reports
To define the order of pages in any report:
Locate the thumbnail image of the page you want to move.
Drag that page to the desired location up or down in the preview pane.
Release the mouse button when you see the crosshair
cursor ( ) to insert the page at that location.

Moving Objects to Other Pages in Custom Reports
In edit mode, you can move one or more objects from one page to another page through the thumbnail images.
Select the objects that you want to move until you see the green handles around them. (You can press Ctrl to select multiple objects.)
Drag the objects onto the thumbnail image of the page where you want to place the objects.
Release the mouse button.
Click on that thumbnail image to go to the page, and position the object.
Another way to move objects to another page is to cut the objects (Ctrl + X), click on the thumbnail image of the page, and then paste the objects (Ctrl + V).
If you select a CADReportObject, and move that to a new page, any labels associated with it also move with it. You cannot move labels to that object by themselves.
Sizing the Preview Pane
You can size the pane with your mouse pointer. To do that, drag the vertical bar that separates the pane from the report. You can size the pane to a maximum of 30% of the report's width and a minimum of 10% of the report's width.
PC-DMIS saves the visibility state of the pane and the pane's width to the current measurement routine. PC-DMIS uses the last used visibility state and width for new measurement routines.