The Laser View is a view in the Graphic Display window that helps you visualize what the sensor "sees". You can access the Laser View whenever you click on the Laser tab.
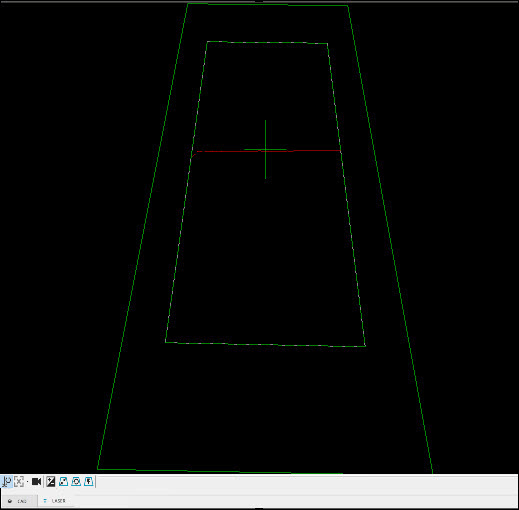
You can use the Laser View during laser probe calibration, scanning, and Auto feature measurement. This tab shows what information PC-DMIS uses. During the scanning process, PC-DMIS disregards any data outside the clipping region rectangle. For more information, see the screen capture in "Laser Probe Toolbox: Laser Clipping Region Properties tab".
Graphic Display window - Laser tab
To turn the laser state on or off in the Laser
tab, click the Start/Stop button ( ). When you make changes
in the Probe Toolbox, you need to turn the laser
state off and then back on to apply the changes in the Laser
tab.
). When you make changes
in the Probe Toolbox, you need to turn the laser
state off and then back on to apply the changes in the Laser
tab.
Perceptron Sensor Additions
 AutoExposure - This button automatically determines
the optimum exposure to use for measurement. You need to aim the laser
at the part before you click this button. For more information, see "Exposure".
AutoExposure - This button automatically determines
the optimum exposure to use for measurement. You need to aim the laser
at the part before you click this button. For more information, see "Exposure".
Perceptron and CMS Sensor Addition
Starting with PC-DMIS 2019 R2, PC-DMIS no longer supports the Perceptron laser sensor. While you may still be able to install PC-DMIS 2019 R2 and later, PC-DMIS displays an error if you attempt to run measurement routines that use the Perceptron scanner. For additional information, please contact Technical Support.
If you use a CMS or Perceptron sensor, PC-DMIS shows these buttons:
AutoGain
- When the HP-L-5.8 sensor is in range of the part, select this button
to learn the best gain setting and update the Probe Toolbox accordingly.
 AutoClip - This button automatically sets the
clipping according to the data present in the Laser
tab.
AutoClip - This button automatically sets the
clipping according to the data present in the Laser
tab.
 Reset Clipping - This button erases the existing
clipping. This resets the entire sensor view for the selected scan zoom
mode. For more information, see "Scan
Zoom States (for CMS Sensors)".
Reset Clipping - This button erases the existing
clipping. This resets the entire sensor view for the selected scan zoom
mode. For more information, see "Scan
Zoom States (for CMS Sensors)".
 Center Part - This button centers the part in
the sensor's field of view.
Center Part - This button centers the part in
the sensor's field of view.
In addition, for Perceptron and CMS sensors, you can drag the clipping region with the mouse. This provides an alternative to adjusting the clipping region by typing values in the Probe Toolbox.
For details on the HP-L-10.10 sensor options, see the "Using Live View with the HP-L-10.10 Sensor" topic in this documentation.
You must have an active Internet connection to see this video.
