Creating Quick Start Measured Features
From the Quick Start
toolbar, select the Measure toolbar. For
details, see the "Using the
Quick Start Interface" chapter.

Click the icon of the feature to measure. The
top-left icon in the dialog box changes to display the features that
PC-DMIS measures in this procedure. Instructions appear on the status
bar.
With PC-DMIS in Offline mode, click the Program Mode icon on the Graphic
Modes toolbar (for details, see "Graphic
Modes Toolbar"). PC-DMIS draws a simulated depiction of the
probe near the part in the Graphic Display window.
With PC-DMIS in Offline mode, right-click to
set the depth for the probe. With PC-DMIS in Online mode, move the
probe to the desired depth.
Take the minimum number of hits on the part
to measure the feature.
Click Finish or press
Done on your jog box when the measurement
is complete. The Quick Start dialog box
remains open. PC-DMIS automatically compensates for the probe radius
and places the measured feature on the part in the Graphic Display
window.
Follow steps four through six until you create
all of the measured features you need.
Click Close when
finished. The Quick Start dialog box closes.
As PC-DMIS takes hits and creates the feature, it draws
the measured feature on the screen. For 3D measured features (Torus, Cylinder,
Sphere, Cone, and Plane), PC-DMIS draws the feature with a shaded surface.
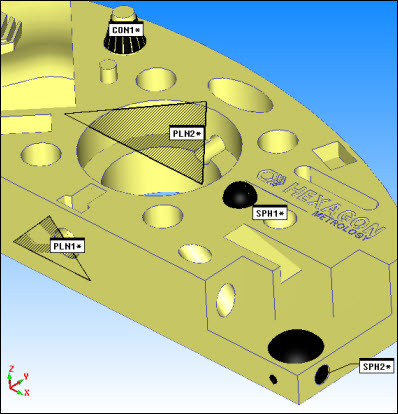
Some sample measured features drawn with shaded surfaces
Creating Measured Features from CAD Using Single Click
Select Option
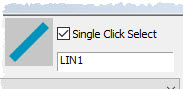
The Single Click Select option
works with all measured features except Torus and scans. PC-DMIS disables
this option internally during Guess Mode. See the note below.
The Single Click Select check
box controls how PC-DMIS creates features when you use CAD. If you select
the check box, you can now learn a measured feature with a single mouse-click
on the CAD model. To do this:
Select the type of feature that you want to
create from the Quick Start dialog box's
Measure toolbar.
Mark the Single Click Select
check box.
Click, with your mouse, on the CAD model near
the feature that you want to create. PC-DMIS locates the feature in
the CAD model and automatically generates the necessary hits to create
the feature. The hit count increases and displays the predefined number
of hits for the feature type you chose.
Feature Type |
Number of Hits |
Point |
1 |
Line |
2 |
Plane |
4 |
Circle |
4 |
Cylinder |
8 |
Cone |
8 |
Sphere |
5 |
Round Slot |
6 |
Square Slot |
5 |
Once PC-DMIS generates the hits, click Finish to insert the feature into the measurement
routine.
Single Click Select and Guess Mode:
 This icon
places PC-DMIS into Guess Mode. Single Click Select does not work
in Guess Mode even though the check box remains selected. For
Guess Mode to function, it attempts to detect the feature type
at each successive hit. To maintain consistency with existing
functionality, PC-DMIS disables Single Click Select internally
if you use Guess Mode. If the Quick Start window is closed, PC-DMIS
automatically reverts to the legacy guess mode even if Single
Click Select was selected when the Quick Start window was closed.
Single Click Select requires you to identify, ahead of time, what
feature is being measured. This capability is unique to the Quick
Start window.
This icon
places PC-DMIS into Guess Mode. Single Click Select does not work
in Guess Mode even though the check box remains selected. For
Guess Mode to function, it attempts to detect the feature type
at each successive hit. To maintain consistency with existing
functionality, PC-DMIS disables Single Click Select internally
if you use Guess Mode. If the Quick Start window is closed, PC-DMIS
automatically reverts to the legacy guess mode even if Single
Click Select was selected when the Quick Start window was closed.
Single Click Select requires you to identify, ahead of time, what
feature is being measured. This capability is unique to the Quick
Start window.
An asterisk icon appears in the top-left corner of the Quick Start dialog box to show that the software
is in Guess Mode.