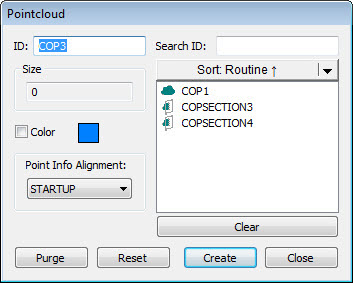

Pointcloud dialog box
The Pointcloud dialog box only has an effect if the COP command contains data.
To open the Pointcloud dialog
box, click the Pointcloud button ( ) on the Pointcloud toolbar, or select Insert
| Pointcloud | Feature.
The dialog box contains the following elements:
ID - This box displays the unique identity of the pointcloud command.
Search ID - If there's a long list of operators defined, you can search using the Search ID box to locate specific operators in the list. When you start to enter the operator's ID into the box, the list automatically filters based on your entry.
Size - This box displays the total number of points in the pointcloud.
Color - This check box allows you to set the color for the scanned points in the pointcloud on the outside of a part. To change the pointcloud color, select the Color check box and then click on the Color box to select a color from the Color dialog box. For additional information on pointcloud colors, see "Pointcloud Scanning Colors".
Commands List - This area contains the list of features or scans that send data to the COP command in the dialog box. A Sort functionality is available to organize the list by ID, Type, Routine, or Time. Select the option from the list and then click the Sort button.
Point Info - With the Pointcloud dialog box open, you can click on a pointcloud point in the Graphic Display window to open the Pointcloud Point Information dialog box. The Pointcloud Point Information dialog box contains information about the point with respect to the alignment. This box contains the point's numerical ID, its coordinates, and the estimated normal of the point. Corresponding CAD points also appear with CAD coordinates and CAD normal. Finally, the deviation between the point and CAD is shown with the scale for the deviation arrow specified in the dialog box. Point selection has no associated operator command. With the Pointcloud Point Information dialog box open, two scenarios are possible when you click the Create Point button:
If there is a CAD model in the measurement routine, and the pointcloud is aligned, a Laser Surface Point is created, inserted, and resolved at the selected position.
Otherwise, a Constructed Offset point is created and inserted in the measurement routine.
Purge / Reset - The Reset button restores all the data stored in a COP command. The Purge button permanently deletes all the data in a pointcloud that is not currently shown, selected, or filtered. This causes the pointcloud to only keep the visible data.
For information on viewing pointcloud point deviation information, see "Pointcloud Point Information".