On a machine with a DCC Zoom, these are the several ways you can alter the magnification of the part image:
Use the Magnification tab: You can do this by either moving the slider bar up or down, or by typing a value in the box next to the slider. By default, the software uses the lowest magnification to get the largest Filed of View (FOV).
Drag the Green Handles of the FOV: Use the FOV handles in the CAD tab to re-size the rectangle. Grab any corner of the green box and drag the outline to its desired location. On a DCC stage, the green boxes on the edges (not the corners) allow you to move the location of the FOV, not change its size.
Zoom in Live View: In the Vision tab, hold down the right and left mouse buttons simultaneously. Drag the cursor across the view, creating an outline of a box. When you release the mouse buttons, the field of view magnifies in the requested location.
Use the Magnification menu: Select menu items from the Operation | Magnification sub-menu or use the Magnification shortcut menu in the Live View. You can right-click within the Vision tab to access the shortcut menu. Be sure that your cursor isn’t over the target when you right-click to access the shortcut menu.
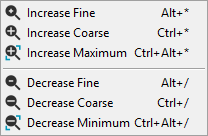
Use Shortcut Keys: Use these shortcut keys to alter the magnification in either the Cad or Vision tabs:
Magnify Action |
Shortcut Keys |
Increase Fine |
ALT + * |
Increase Coarse |
CTRL + * |
Increase Maximum |
CTRL + ALT + * |
Decrease Fine |
ALT + / |
Decrease Coarse |
CTRL + / |
Decrease Minimum |
CTRL + ALT + / |
The numbers displayed next to the top left and bottom right corners of the image in the Field of View box of the Probe Toolbox, indicate the X and Y coordinate values for the FOV. It also displays the current magnification size in pixels.