The controls shown in the Hit Targets tab in the Probe Toolbox let you edit, test, and modify the targets and parameters used to measure the feature.
This is the toolbar at the top of the tab:
The following table describes what these controls do:
Define Target Button |
Description |
||
|
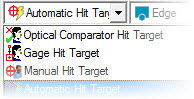
The Target Type list lets you choose the target type to create new targets. The available target types include: |
||
|
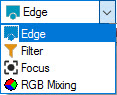
The Parameter Set list lets you change between these parameter sets:
These are discussed in "Available Parameter Sets". |
||
|
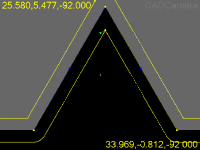
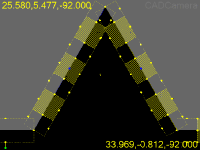
The Target Feature Coverage list allows you to quickly create target sections to measure a subset of a feature. Limiting coverage can decrease feature execution time. For example, if you measure a large feature at high a magnification value, it may require a lot of camera positions to get all the edge points. Selecting "10%" coverage would only measure edge points at certain locations around the feature - amounting to 10% of its form. Notice in the example below that the same feature covered at 100 percent is altered to have many targets that provide a coverage of 50 percent.
|
||
|
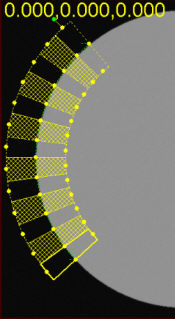
The Set Target Feature Coverage Active Targets list determines the number of targets to use to display the selected coverage percentage in the Target Feature Coverage list. The default value is 4. For example, a 50% coverage on an arc, with a value of 7 active targets set from this list, would result in target sections that looked like this:
Example Active Targets |
||
|
The Hit Target Color list specifies the color to apply to the feature hit targets. This allows you to differentiate between features, or to ensure visibility on different surface types. |
||
|
The Nominal Color list specifies the color to apply to the feature nominal line. This allows you to differentiate between features, or to ensure visibility on different surface types. |
This is the toolbar at the bottom of the tab:

The following table describes what these controls do:
Define Target Button |
Description |
|
The Lock Hit Targets to Part button secures the size, position or rotation of the target. |
|
The Center Hit Target button centers the target or Field of View (FOV). What actually moves depends on the status of the Lock Hit Targets to Part button. If you first select the Lock Hit Targets to Part button, and then select the Center Hit Targets button, PC-DMIS Vision moves the current FOV to the target. This is only available on DCC Motion machines. If you deselect the Lock Hit Targets to Part button, and select the Center Hit Targets button, the target moves to the current FOV. |
|
The Insert New Hit Target button inserts a new target area. You can then set up different parameters for this specific area of the feature. |
|
The Delete Hit Target button lets you delete a previously inserted target from the feature. |
|
The Reset Hit Target(s) button deletes all of the previously inserted target areas from the feature, leaving the single default target. |
|
The Hit Target Test button tests the automatic Target Edge detection for the currently selected target or targets. PC-DMIS Vision displays any detected points in the Vision tab of the Graphic Display window. |