 Step
1: Create a Blank Label Template
Step
1: Create a Blank Label TemplateThis topic walks you through a basic tutorial to create a simple label template with a few objects and a GridControlObject. This provides you with a basic overview of how label templates work and how to use them to display custom information in your reports.
This tutorial builds on skills you learned in the "Creating a Custom Report Template" tutorial; be sure to complete that section first.
 Step
1: Create a Blank Label Template
Step
1: Create a Blank Label Template
Select File | Reporting | New | Label Template to access the Label Template Editor. A blank label template automatically appears.
To hide any unused toolbars, right-click on the toolbar area and remove them.
To hide any unused PC-DMIS windows, select the open window from the View menu.
To maximize the template editor, click
the Edit window's maximize
button![]() . You should see the words "LABEL"
on the background of the editor.
. You should see the words "LABEL"
on the background of the editor.
Size The Frame/The View in the label template editing area to four inches wide and one and a half inches high. To do this, click and drag the bottom right hand corner of the label template with your mouse. Use the rulers as a guide.
You have created a blank label template. When finished
with this step, it should look something like
this:
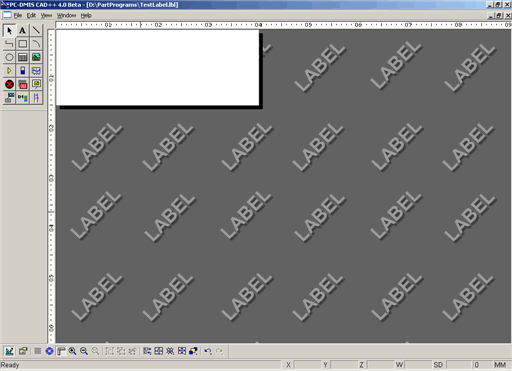
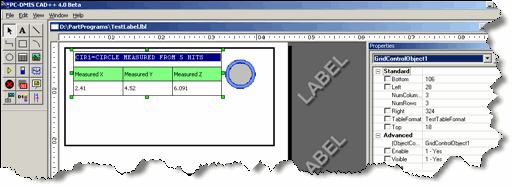
Label Template Editor
When working with one of the template editors, you may find it helpful to hide your usual PC-DMIS toolbars and windows, thereby freeing up some screen space. If you work frequently with templates, you may want to create a stored screen layout for your template. For information on layouts, see the "Window Layouts Toolbar" topic in the "Using Toolbars" chapter.
Step
2: Add a CommandTextObject
and Static Information into the Template
Click the CommandTextObject icon . The pointer changes to a cross-hair.
With your mouse pointer, drag a box so that it stretches about three inches wide by one half inches high. PC-DMIS inserts a CommandTextObject into your label template. Right-click on it to access the Properties dialog box.
Click the Colors property. If PC-DMIS asks if you want to define a color set independent from the default application colors, click Yes.
The Color Editor opens. PC-DMIS uses this editor to define Edit window colors. However, in this case, it only affects the current CommandTextObject.
Under Background Color, click Edit. A standard Color dialog box opens.
Give the object's background color a dark blue color. To do this, change the values in the Red, Green, Blue boxes to 0, 0, 128 respectively. Click OK.
In the Unmarked box, click Edit. A standard Color dialog box opens.
Select white, and then click OK. If PC-DMIS asks if you want to change the item's children, click No.
Use a bitmap image of a circle (or use the Ellipse object to draw a circle) and place it in the top right of the canvas.
You have added the CommandTextObject and a static Bitmap or Ellipse object for a circle shape into the label template. At the end of this step, your label template should looks something like this:
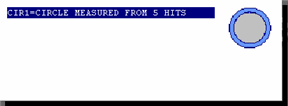
Label Template showing the CommandTextObject and a static Bitmap object
Step
3: Insert and Format a GridControlObject
Click the GridControlObject icon .
The pointer changes to a cross-hair.
.
The pointer changes to a cross-hair.
With the pointer, drag a box for this object under the previously inserted CommandTextObject, so that it has the same width.
Size the height so that it nearly fills the rest of the canvas. When inserted, the grid shows several rows and columns.
Access the object's properties, and then change the Columns and Rows properties to 3 each.
Select the object and select a cell. To do this, double-click on the first cell in the top row. It will highlight the cell in a blue background to show that you have selected it.
Select the entire top row. To do this, with the first cell selected, press the Shift key, and then click on the last cell in that row. PC-DMIS highlights the entire row.
Right-click the GridControlObject.
The object's dialog
box appears. This dialog box lets you control
the formatting of the selected cells as well as insert text and
expressions.
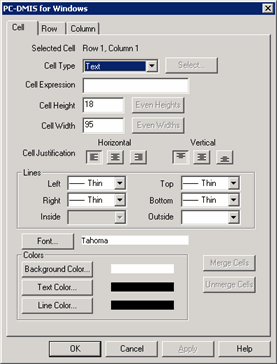
The GridControlObject's dialog box
Click the Merge button to merge the selected cells.
Set the background color for the merged cell. Click the Background color button to open the Color dialog box. Choose a dark blue color and click OK.
Set the text color for the merged cell. Click the Text color button, and select white in the same way.
To create headings, select the first cell in the second row, and right-click to bring up the dialog box. In the Cell Expression box, type "Measured X". Close the dialog box, and repeat the process on the second cell, typing "Measured Y". Finally, repeat it again for the last cell, typing "Measured Z".
Select the entire second row. Right-click and use the dialog box to select a light green background color.
Under Cell Justification,
under Vertical, click the middle
button to vertically center the text in their
cells.
to vertically center the text in their
cells.
Click OK to close the dialog box and then deselect the object.
You have inserted a GridControlObject and learned how to change the number of rows and columns. You learned how to add text into a cell and how to format the grid by using this object's special dialog box. When finished with this step, your label template should look something like this:
Label showing the inserted and formatted GridControlObject
Step
4: Add Expressions Into the GridControlObject
Select the GridControlObject's first row.
Once it's selected, type "=ID" directly into the cell. This is an expression that tells PC-DMIS you want to display the feature's ID in the cell.
Select the first cell in the third row and type "=MEAS_X"
Select the second cell and type "=MEAS_Y".
Select the third cell and type "=MEAS_Z". These expressions tell PC-DMIS you want to display the feature's X, Y, and Z values. When you deselect the object, PC-DMIS displays the expression values from the filler text used by the object. See "About Report Expressions" for information on expressions.
With the Border object, draw a border object around the label. You may need to resize the label to close to four and a half inches wide by two inches high.
Right-click the border, and give it a line width of 2.
Adjust the location of the contents so they are within the border.
You have added some report expressions into your label template and then drew a border around the template prior to testing it. When you finish this step your template should look something like this:
Label showing the results of the expressions
Step
5: Save and Test the Label Template
Select File | Save to save the label template. In the Save As dialog box, name the template "TestLabel.lbl".
Select File | Close to close down this template editor.
Select File | Reporting | Edit | Report Template and then select the Test1.rtp template file you created from the previous tutorial.
Select the TextReportObject you inserted into the first section of the report template and then access its properties.
Use the Rules Tree Editor and the Edit Rule dialog boxes to create a rule that will display TestLabel.lbl in that TextReportObject object for all measured circles. If you can't remember how to create rules, follow the procedure in the "Defining a Rule topic".
Select File | Save to save the report template.
Select File | Close to close it.
Execute the measurement routine and apply the template.
Select View | Report window to display the final report.
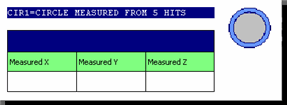
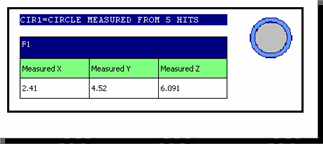
After you save and test your label template, it should look something like this:
Report window example showing the newly created label. Notice the measured X,Y, and Z center point data for each circle feature.
Step
6: Create a Repeating Row
So far, your label displays the XYZ of your circles' centers. Suppose, however, you wanted to get individual hit data instead. You can do this using repeating rows.
Select File | Reporting | Edit | Label Template. Select TestLabel.lbl from the dialog box and click Open. PC-DMIS loads the Label Template Editor and displays TestLabel.lbl.
Access the GridControlObject.
Select the first cell in the third row. Once you select it, right-click to bring up the GridControlObject's dialog box.
Click the Row tab.
Select the Repeating
Group check box. This tells PC-DMIS that you want to make
that row repeatable. The Repeat Expression
dialog box becomes available. Notice that the row, at this point,
contains orange
markers on the left and right sides. This
indicates that the row is a repeating row.

A row showing orange markers
Type "=N_HITS" in the Repeat Expression box. This tells PC-DMIS to get the total number of hits in the feature and to repeat the row for each available hit.
Click the Cell tab. You should see "=MEAS_X" in the Cell Expression box. Append ":N" to the expression so that it reads, "=MEAS_X:N". This tells PC-DMIS to repeat the expression in that cell for each available hit.
Select the other two cells in the row, and modify them so that they have the ":N" code added as well: "=MEAS_Y:N" and "=MEAS_Z:N".
Because the labels will expand to include all the data passed into the GridControlObject, when the row repeats, you do not need to adjust the label's size for this.
Click OK to close the GridControlObject's dialog box.
Save the label template and access the Report window. Click the Redraw the Report icon from the Reporting toolbar to see your latest changes. Notice that instead of displaying the center point data for the circles, PC-DMIS displays individual hits.
You have learned how to create a basic repeating row to count and display several items of data without needing to create different report templates with different row configurations.
Step
7: Use the Columns Tab to Define Columns
Access the TestLabel.lbl label template, and select the existing GridControlObject.
Select its first row and then right-click it to bring up the GridControlObject's dialog box.
Click the Unmerge Cells button. The single cell making up the first row now becomes three cells.
Delete the "=ID" expression text in the first cell. You don't really need this expression in your final label template because the CommandTextObject displays it automatically.
Use the Background Color and Text Color buttons to change the cell's background color to white and its text to black.
Delete the inside column lines in the first row. To do this, select the first cell, access the dialog box, in the Cell tab, in the Lines area, change the line value of the Right list from Thin to None. Repeat this for the middle cell as well.
Click OK to close the GridControlObject's dialog box. While your label template may appear to have its cells merged, in reality, column lines in those cells are merely hidden.
Select the left cell in the first row and access the dialog box.
Click the Column tab. In the Column list box, type "Measured X". Click OK to close the GridControlObject's dialog box.
Repeat this for the middle and right cells, typing "Measured Y" and "Measured Z" respectively. You will use these column headings to control each columns visibility and ordering later on.
Select the CommandTextObject you added to the template earlier, and drag it down so that it rests on top of the GridControlObject's first row.
Modify the location or size of the Ellipse or circle Bitmap object you created earlier so that it's centered along the right side of the GridControlObject.
Select and then drag the top line of the Border object down so that it's just above the GridControlObject.
Drag a box around all the objects in the label to select them all. Then drag those objects up to the top and to the left as far as they will go on the label's canvas.
Right-click to access the GridControlObject's properties.
Type "TestTableFormat" in the Table Format property, and press the Tab key.
Save and close your label template.
In this step, you learned how to unmerge cells, set cell line properties, insert column headings, and select and move multiple objects. Defining column headings will let you control the visibility and ordering of your columns on the fly. When you have finished this step, your label template should look something like this:
Step
8: Define a Grid Format Table
Open the report template, Test1.rtp, in the Report Template Editor.
Select the TextReportObject, and right-click to access the Properties dialog box.
In the Rules Tree property, click Rules to open the Rule Tree Editor dialog box.
Use the Rule Tree Editor and navigate to the rule you created earlier.
Select the rule and click Edit to open the Edit Rule dialog box.
Click the Grid Format button. The Table Format Properties dialog box opens.
In the New Table Name box, type "TestTableFormat", and click Add Table.
Under the Columns list in the edit box, type "Measured X", and then click Add Column.
Add columns for "Measured Y" and "Measured Z" in this same manner.
Click OK on the various dialog boxes until your return to the Report Template Editor.
Select File | Save to save the report template.
Select File | Close to close the Report Template Editor.
In this step, you tied the GridControlObject's columns to the TestTableFormat table in the Table Format Properties dialog box by adding columns with the exact same name and naming the table the same name you gave the Table Format property. Since you haven't changed the order or visibility at this point, the newly created table in the dialog box should look like this:
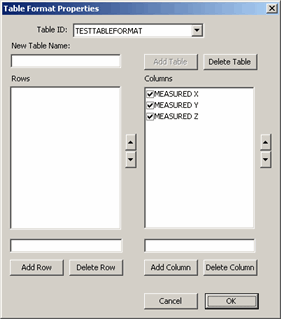
Table Format Properties dialog box showing the newly created TestTableFormat table
Step
9: Use Table/Format Command to Control Column Visibility and Order
If the Edit window is not visible, select View | Edit Window to display the Edit window.
Place the Edit window in Command mode.
Select Insert | Report Command | Table Format. The Table Format Properties dialog box opens.
From the Table ID list, select the TESTTABLEFORMAT table. The Columns area shows the columns available to this custom table format.
Clear the Measured Z box to hide that column in the final report.
Select Measured Y and click the up arrow icon next to the Columns area to reorder the Measured Y column so that it gets displayed first in the report.
Click OK. PC-DMIS
inserts a TABLE/FORMAT
command into the Edit window. This command controls the visibility
and order of your columns.
TABLE/FORMAT,TESTTABLEFORMAT
COLUMN/ORDER,MEASURED Y,MEASURED X, ,
ROW/ORDER
Save and execute your measurement routine. When PC-DMIS runs, notice that the order of the Measured X and Measured Y values have changed, and the Z column is hidden
In this final step, you learned how to insert and use a TABLE/FORMAT command to define the order and visibility of the columns in the label template. Your finished report should look something like this:
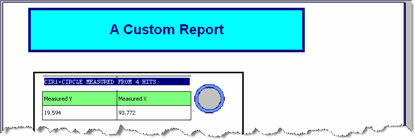
Finished report showing only the Measured Y and X columns