Click the Toggle Grid
icon ( ) from the Layout
Bar.
) from the Layout
Bar.
Press Ctrl + G.
When working in a form or template editor, PC-DMIS can display or hide a grid on the background of your form or template in these ways:
Click the Toggle Grid
icon () from the Layout
Bar.
Press Ctrl + G.
You can use this grid as a tool for the accurate placing and sizing of objects. It also helps you control a template's margin guidelines.
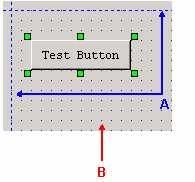
A - Guidelines
B - Grid markings
Example showing the default grid's markings and guidelines
Select Edit | Layout | Grid Settings to access the Grid Settings dialog box.

Grid Settings dialog box
You can then use this dialog box to customize the grid. A description of the controls in this dialog box follows:
Show
Grid check box
The Show Grid check box toggles the display of
the grid.
Snap
to Grid check box
The Snap to Grid check box determines whether
controls placed on the grid get moved, or snapped, to the nearest grid
location.
Spacing
area
The Spacing area sets the amount of spacing between
the grid markings. The smaller you set these numbers, the closer together
the grid markings are.
Guidelines
area
The Guidelines area allows you to determine the
location of the top, left, right, and bottom margin guidelines for the
template editor.
The value in each of these boxes sets the distance in grid markings to where the guideline is set. Setting the value to zero removes the guideline completely.
You cannot place objects beyond these guidelines.