To create a section cut, you need to define these pieces of information:
A cut plane
A start point on the section cut
An end point on the section cut
Step 1: Define the Cut Plane
To define the cut plane, specify a point on the plane. You can do this in two ways:
You can select the Select plane point option. Then click a point on the CAD model.
In the Plane Point area, you can manually type the XYZ values.
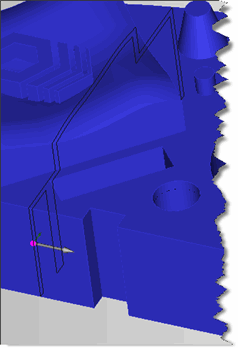
Once you define the cut plane, PC-DMIS draws a gray arrow that indicates the plane point and the direction of the cut plane normal vector. In addition, PC-DMIS draws a polyline (or one or more connected lines) on the CAD model. This represents the intersection of the plane (called the "cut plane") with the surfaces in the entire CAD model. Multiple section cuts are drawn as different-colored polylines to show when very small surface gaps are present. Since you haven't defined the start and end points yet, the red and magenta dots, which represent the start and end points respectively, initially appear on the CAD model at the plane point's location:
A sample plane point (indicated by the gray arrow) and cut plane (indicated by the black lines) drawn atop the CAD model
If the plane intersects the model in more than one location, PC-DMIS draws all the intersections.
Once you define the cut plane point, you can optionally specify the cut plane's normal vector. By default, the normal vector is (1,0,0). You can modify this normal vector by selecting an option in the Plane Vector Selection area. This shifts the normal along one of the selected axes. You can also define your own custom vector.
Step 2: Define the Start and End Points along the Section Cut
Now that you have defined the cut plane, you need to define a start and end point along the section cut. To define the start and end points, use any combination of these different methods, depending on your preference:
Method 1: Click on the CAD
Choose the Select start point option and then click a point on one of the black lines making up the section cut. This defines the distance away from the Plane Point along the section cut and places that distance in the Start arc length box. PC-DMIS places the XYZ values for the selected point into the Start Point area.
Choose the Select end point option, and then click another point on the same section cut. This defines the length of the arc between the start and end point. PC-DMIS places the XYZ values for the selected point into the End Point area.
Method 2: Type Arc Values
Define the start point by specifying the distance away from the Plane Point by typing the value in the Start arc length box.
Define the end point by specifying the arc's length. Do this by typing the value in the Arc length box.
Method 3: Type XYZ Values
To define the start and end points, type the XYZ value in the Start Point and End Point areas.
The start and end points must be on the same section cut. For example, if a gap between two surfaces breaks your section cut into multiple cuts, the start and end points must be defined on only one cut. If you try to select the start and end points across different section cuts, the first selected point is removed, and you need to select it again.
A red dot appears on the CAD model representing the start point and a magenta dot appears representing the end point. Additionally, PC-DMIS draws green arrows along the section to show where PC-DMIS will create the section cut points. If the surface is curved, then PC-DMIS draws several arrows. If the surface is flat, then PC-DMIS draws these green arrows only at the start and end points (because the Point Density area has Minimum Density selected by default).
You can modify options in the Point Density area to control the number of points between the start and end points:
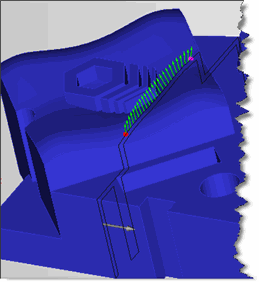
A sample section cut showing 25 equally spaced points between the start point (red dot) and the end point (magenta dot)
Step 3: Define and Create the Output
Select the desired output format in the Output area. The output can either be in individual Auto Vector Points or a Linear Open scan that contains the points.
Modify any other controls as needed. These enable you to customize the parameters that affect the plane, start and end points, point spacing, and feature type created.
Click the Create button to create the output features or scan.
PC-DMIS creates the specified feature or features in the measurement routine.
Fixing the Direction of Normals Along the Section Cut
The green arrows represent the surface normal vectors at the points. The section cut algorithm is designed so that the surface normal vectors along the section cut do not flip as they transition across multiple surfaces. However, these vectors may all point in the wrong direction (inside the part). If these arrows point in the wrong direction, click the Flip Vectors button to fix them.
Fixing Gaps Between Surfaces
Because of small gaps between surfaces, sometimes the section cut ends before it has wrapped all the way around the part. This is caused by the CAD resolution being smaller than the gap distance. As long as the gap between surfaces is greater than the CAD resolution, it breaks the section cut. To help identify gaps, the separate section cuts are drawn in different colors. To fix this problem, increase the CAD resolution with the CAD Tolerances dialog box.
To do this:
Select Edit | Graphic Display Window | CAD Tolerances to open the CAD Tolerances dialog box.
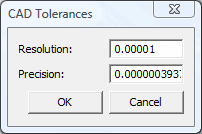
CAD Tolerances dialog box
Change the resolution to a value greater than the gap distance. It may take some trial and error to find a resolution value that is large enough. For more information, see "Changing CAD Tolerances" in the "Editing the CAD Display" chapter in the PC-DMIS Core documentation.
Click OK.
Create the section cut again.
The section cut now jumps across the gap.