Step 4 - Prepare for Calibration
This step starts the calibration process for the HR-MS or HR-X1 Probe Changer.
To start the calibration process, follow these steps:
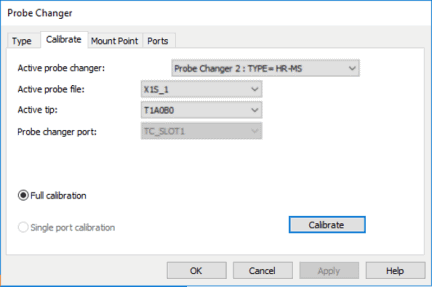
Select the Calibrate tab in the Probe Changer dialog box (Edit | Preferences | Probe Changer).
Depending on which probe changer you are calibrating, in the Active probe changer list, select Probe Changer 1: TYPE=HR-MS or TYPE=HR-X1:
Probe Changer dialog box - Calibrate tab
The entry in the Active probe file list defaults to the current measurement routine setting. If this is not the correct probe for the rack calibration, select it from the list.
The entry in the Active tip list defaults to the current measurement routine setting. If this is not the correct tip for the rack calibration, select the correct tip ID from the list. This is usually the tip corresponding to the angles defined on the Mount Point tab in Step 2.
Click Calibrate. For a full calibration using manual hits, PC-DMIS shows one the following message:
For full calibration:
PC-DMIS
The change rack has been previously calibrated.
If it has been moved since the last calibration
you must take manual hits to locate it.
If it hasn't been moved you may be able to recalibrate
it in DCC mode without taking manual hits.
Has the rack been moved since the last calibration?
For single-port calibration:
PC-DMIS
The port has been previously calibrated.
If it has been moved since the last calibration
you must take manual hits to locate it.
If it hasn't been moved you may be able to recalibrate
it in DCC mode without taking manual hits.
Has the port been moved since the last calibration?
If you click Yes on this message, PC-DMIS shows the following message for a full calibration:
If your changer has
lids, open the lids on all ports.
Remove any stylus holders from the ports.
If this is a single port calibration, PC-DMIS shows a similar message:
If port 1 has a lid,
open it.
Remove any stylus holder from that port.
Remove the requested modules or styli by sliding them forward and out of the stylus holder.
When you are ready to take the first measurement, click OK.
In the next step, you take the first manual hit.