Access the Animated Probe Changer dialog box (Insert | Hardware Definition | Animated Probe Changer).
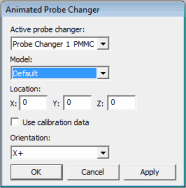
Animated Probe Changer dialog box
Select an existing pre-defined probe changer from the Active probe changer list. If you don't see any probe changers in this list, you can define a probe changer from the "Defining Probe Changers" topic in the "Defining Hardware" chapter.
The Model list allows you to animate a custom model of a PMMC probe changer. This list only becomes available for selection if you first select a PMMC probe changer from the Active probe changer list. The Default entry in the Model list is the standard PMMC model supplied with the PC-DMIS install. For custom items to appear in the Model list for selection, you need to first configure a customized PMMC model. To do this, follow the instructions in the "To Load in a Custom PMMC Probe Changer" topic.
Define the location and orientation of the probe changer. You can do this by either using calibration data for the location and orientation or by specifying the XYZ location and orientation directly into the dialog box.
To use existing calibration data select the Use calibration data check box. PC-DMIS fills in the location boxes with the XYZ values from the calibration.
To directly specify the location and orientation, type values into the X, Y, and Z boxes, and then select an orientation from the Orientation list.
Click Apply. PC-DMIS draws the animated probe changer in the specified position and orientation in the Graphic Display window. PC-DMIS also inserts a LOADPROBECHANGER command into the Edit window.
Click OK when you're satisfied with the orientation and position.