You can construct a point from any feature and a line (cone, cylinder, or slot). PC-DMIS drops the centroid of the first feature onto the second feature. The "dropped" point is dropped on a line that is perpendicular to the line, centerline, or plane. If two line features are selected, PC-DMIS drops the centroid of the first line feature onto the second line feature.
For this construction method, you must select feature types in the correct order.
To construct a drop point:
Select Insert | Feature | Constructed | Point to display the Construct Point dialog box.
Select the Drop Point option from the list of options.
Select the first feature. It may be of any type.
Select the second feature. It must be cone, cylinder, line, or slot.
Click the Create button.
The Edit window command line for this option would read:
CONSTR/POINT,DROP,feat_1,feat_2
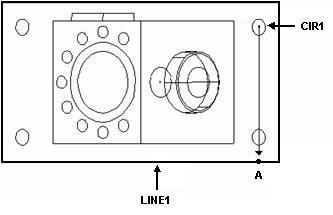
A - Point is constructed by normally projecting circle, CIR1 (the designated point) to line, LINE1
Constructing a drop point from a circle and a line
If you select a slot as one of your input features, PC-DMIS uses the slot centerline vector when it constructs this point instead of the slot normal vector. If you want to use the older slot normal vector, you need to modify the value for the UseLegacySlotVector entry in PC-DMIS Settings Editor. For information on how to do this, see "Modifying Setting Entries".