
The Create New option (Insert | Report Command | External Object) enables you to create a new file of a particular object type at a specified location in the Edit window. The object types are chosen from the Object Type list. Objects can only be placed just after or just before a feature in the measurement routine.
To create a new object and place it in the Edit window:
Select the Create New option.
Select the desired object type from the Object Type list. The object will appear in a box, bounded by small rectangular points within your Edit window. Use your mouse to drag the box to another location or resize the box using the small rectangles.
Double-click within the object. You will see that the application that runs that particular object opens in the Edit window.
Modify the object by using the tools specific to the inserted application.
When you are done, click on the portion of the Edit window that is outside of the inserted object.
Select the Create New option.
Select a word document object from the Object Type list.
Drag the object box with the mouse to a desired location within the Edit window.
Resize the box to the desired size.
Type the information within the word document object.
Click outside of the object to return to normal PC-DMIS Edit window functions. The word document will remain in the Edit window.
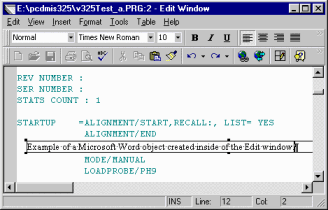
Example of a word document created in the Edit window. Notice how the Edit window's menus and toolbars are replaced with the menus and toolbars of the application that corresponds to the object you are creating.