By default, PC-DMIS assigns new commands to the current active arm. You can use the Active Arms toolbar (View | Toolbars | Active Arms) to switch the current active arm or to execute only those commands tied to a specific arm.
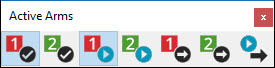
Active Arms toolbar
The Active Arms toolbar contains multiple arm icons with corresponding color coded check mark icons. Each arm icon corresponds to an arm on the machine.
|
Arm1 |
|
Arm2 |
|
Execute on Arm1 |
|
Execute on Arm2 |
|
Move to Arm1 Start Point |
|
Move to Arm2 Start Point |
|
Execute From Start Point |
The Arm(n) icons (those with numbers) switches the current active arm.
The Execute on Arm(n) icons (those with check marks) executes only those commands associated with a specific arm.
The Move to Arm(n) Start Point icons move the cursor in the routine to the top of that arm's starting position.
The Execute From Start Point icon executes the routine for both arms at the currently defined start point.
Once Multiple Arm Mode is initiated, PC-DMIS inserts colored vertical lines into the left margin of the Edit window's command mode. This is used to identify the commands that are used for each arm. (In Summary Mode, PC-DMIS indicates commands assigned to the Arm2 with bold text.)
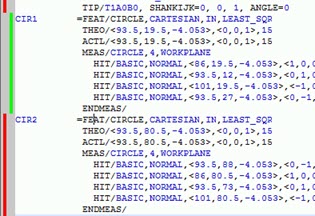
Edit window with green (feature CIR1) and red (feature LIN1) lines designating Arm2 and Arm1 portions respectively
Features assigned to Arm1 are indicated using the red line.
Features assigned to Arm2 are indicated using the green line.
Features assigned to multiple arms are indicated using multiple colored lines.
Colored horizontal bars (instead of vertical) signify that the commands affect both arms and neither arm is allowed to execute this command until both arms have executed all prior commands. This type of command (usually a branching or alignment command) is executed by both arms at the same time.
More:


