If you need to calibrate a star probe that uses a wrist map, you must perform a specific sequence of operations. You must also pay particular attention when you set the wrist rotation angles. Consider this example which shows how to calibrate a typical "L"-shape star probe configuration with a wrist map:
Overview
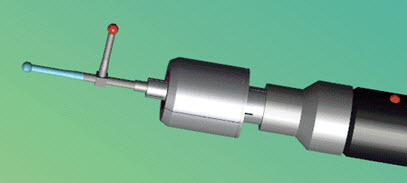
A star probe is not always composed of all five tips. Star probes often have only two tips. One tip connects along the central axis of the wrist. The second tip connects to an empty connection point to form an "L"-shape configuration like this:
Example of an "L"-shaped star probe formed from two tips
To calibrate the star probe, you must define at least five wrist rotations (AB angles) and then measure the calibration tool with those rotations.
The wrist must already be mapped. Also, from the Probe Utilities dialog box (Insert | Hardware Definition | Probe), you must mark the Use wrist map if available check box. This ensures that PC-DMIS uses the wrist map and takes a sufficient number of measurements on the calibration tool to calibrate the star probe.
Define Wrist Five Rotation Angles

Example of a star probe defined with five wrist rotations (AB angles)
On the ARM2 arm, the wrist holds a probe that has two tips: T1 (the central tip) and T2 (the side tip). These form an "L" configuration.
When the wrist rotates to A = 0 and B = 0, T1 has a Y- direction, and T2 has Z+ direction.
You already start with one AB wrist rotation on your current tip. To get the minimum of five wrist rotations, you need to add four more wrist rotations that to later measure the calibration sphere. This provides the best distribution of points during the calibration process.
When you define the four rotations, you can unintentionally define rotation values (AB angles) that can calibrate T1, but cannot calibrate T2. To avoid this, take care to choose the most suitable values for the direction of the T2 tip.
You should choose rotation angles that allow T2 to always touch the calibration tool but won't collide with the tool's stem.
To accomplish this, the above example adds these wrist angles:
A = -90, B = 0
A = -90, B = 180
A = -90, B = -90
A = -90, B = 90
With these additional wrist angles, during calibration T2 always touches the calibration sphere, but it never collides with the calibration sphere's stem.
Once PC-DMIS detects these new tips in the Active tip list, it automatically creates an additional five tips. This gives you a total of ten tips: five tips with an identifier of "T1", and five tips with an identifier of "T2".
Calibrate Mapped Wrist
Once the ten wrist rotations appear in the Active tip list, you can calibrate them. To calibrate, you must measure the calibration sphere separately for each group of T1 and T2 tips.
You can use the AUTOCALIBRATE command to invoke the parameter sets for each group. The image below shows two parameter sets (UPDATE_T1 and UPDATE_T2) that combine the respective rotations for T1 and T2:

Example of a Star Probe with parameters UPDATE_T1 and UPDATE_T2
Calibrate Non-Mapped Wrist
If the star probe was calibrated without a mapped wrist, you can calibrate the T1 and T2 tip list in the traditional method.

Example of a Star Probe without a wrist map
You can use a custom parameter set with the AUTOCALIBRATE command to measure all ten tips in the list on the calibration sphere.
The example above shows a parameter set named CALIBRATE_TIPS for this purpose.