With the HxGN
Robotic Automation application running, click the left-most
green Connector Application button ( ) in the bottom-right of the screen. This opens the HxGN Robotic Automation
Connector application's dialog box.
) in the bottom-right of the screen. This opens the HxGN Robotic Automation
Connector application's dialog box.
You configure the communication between PC-DMIS and HxGN Robotic Automation with the Connector application.
To do this:
With the HxGN
Robotic Automation application running, click the left-most
green Connector Application button () in the bottom-right of the screen. This opens the HxGN Robotic Automation
Connector application's dialog box.
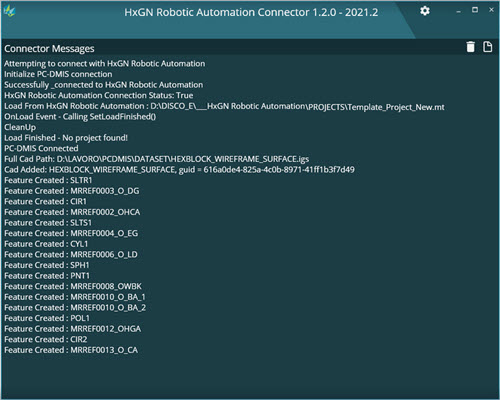
HxGN Robotic Automation Connector application dialog box
The Connector application displays the log of communication event messages.
You can click the Clear Log button to permanently delete all log messages.
You can click the Export Log button to copy the list of messages into a log file.
You can click the
Clean Pointcloud Folder button to delete
the pointcloud data files in the folder where HxGN
Robotic Automation stores the pointcloud data from
PC-DMIS. You can define how the Connector application does this in
the Application Settings dialog box, available
from the Setup button ( ).
).
To configure or review the Connector application
settings, click the Setup button () in the upper-right of
the dialog box.
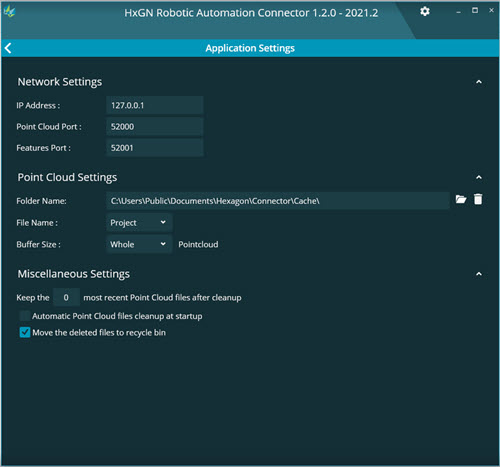
HxGN Robotic Automation Connector dialog box - Application Settings
The Application Settings dialog box has these areas:
Network Settings - This area defines these settings:
IP Address - This box defines the communication address of the computer that runs the HxGN Robotic Automation application.
Pointcloud Port - This box defines the port number that PC-DMIS uses to read in the pointcloud data from the HxGN Robotic Automation application.
Features Port - This box defines the port number that the HxGN Robotic Automation application uses to read in the feature data from the PC-DMIS application.
Pointcloud Settings - This area defines these settings:
Folder
Name - This box defines the location where HxGN
Robotic Automation saves all pointcloud files. You can
type the location directly into the box or use the Folder
button ( ) to open a
dialog box and navigate to the folder location of your choice.
) to open a
dialog box and navigate to the folder location of your choice.
File Name - This box defines the prefix of the HxGN Robotic Automation pointcloud file name. The default is the project name, but you can select the Custom option from the File Name list and type an alternate prefix for your file names.
Buffer Size - This option allows you to select how the Connector application sends the pointcloud to PC-DMIS for processing.
If you select Whole from the list, the Connector application sends the entire pointcloud to the PC-DMIS application.
If you select Packets and then type the number of stripes in the Stripes box, the Connector application sends the pointcloud in small chunks to the PC-DMIS application. Each chunk (or packet) contains the entered number of stripes. This continues until the entire pointcloud is sent.
Run Time Drawing check box - When you select this check box, PC-DMIS shows each pointcloud packet in the Graphic Display window as soon as it is sent to the PC-DMIS application.
Miscellaneous Settings - You can use this area to set the number of pointcloud files you want HxGN Robotic Automation to keep when you click the Clean Pointcloud Folder button.
For example, if you set this value to 1, when you click the Clean Pointcloud Folder button, HxGN Robotic Automation deletes all but the most recent pointcloud files from the folder. If you set this value to 2, when you click the Clean Pointcloud Folder button, HxGN Robotic Automation deletes all but the two most recent pointcloud files from the folder, and so on.
If you select the Automatic Pointcloud files cleanup at startup check box, HxGN Robotic Automation cleans the pointcloud folder based on the value you set each time you restart the application. This is permanent unless you select the Move the deleted files to recycle bin check box.
If you do not want to permanently delete the pointcloud files when you click the Clean Pointcloud Folder button, you can select the Move the deleted files to recycle bin check box. This saves all the deleted pointcloud files into the Recycle Bin instead of permanently deleting them from your system.
Click the Back button
( ) to return to the log
screen or click the close button (X) in
the upper-right of the window to close the HxGN Robotic Automation
Connector application.
) to return to the log
screen or click the close button (X) in
the upper-right of the window to close the HxGN Robotic Automation
Connector application.
More: