Double-click the desired boundary point in the ‘#’ column to display the Edit Scan Item dialog box.
Edit Scan Item dialog box
Manually edit the X, Y, or Z value.
Click the OK button to apply the changes.
To set the boundary of a scan by typing:
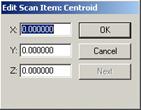
Double-click the desired boundary point in the ‘#’ column to display the Edit Scan Item dialog box.
Edit Scan Item dialog box
Manually edit the X, Y, or Z value.
Click the OK button to apply the changes.
Click Next to accept the changes and display the next boundary point for editing.