Portable devices take only one hit on the feature to create a measured circle feature. This is termed a "single-point" circle. This is useful when you attempt to measure a hole with a probe whose sphere size is larger than the hole's diameter. In this case, the probe cannot fit entirely into the hole to take the usual required minimum three hits. To handle this, PC-DMIS creates the feature at the intersection of the workplane (or projection plane if a measured plane is currently active) and the probe sphere.
You can create measured or auto single-point circles:
To create a single-point measured circle, see "Creating a Single-Point Measured Circle".
To create a single-point auto circle, see "Creating a Single-Point Auto Circle".
When a Measured Plane Feature is not Available
If a Measured Plane feature is not available, PC-DMIS displays a message.
If you choose No, the Reference Feature type defaults to "WORKPLANE".
If you choose Yes, PC-DMIS displays the Quick Start for Measure Plane mode to define the appropriate reference feature.
Measure Plane Mode Quick Start dialog box
After the plane is done, the Quick Start dialog box returns to the Measured Circle mode. PC-DMIS Portable automatically adds the Measured Plane into the reference feature name list and highlights it in the Edit window.
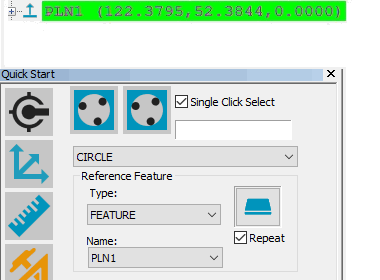
Measured Plane added into the Edit window Reference Feature name list
Creating a Single-Point Measured Circle
Select View | Other Windows | Quick Start to access the Quick Start interface. Single-point measured circles do not work with any other creation method.
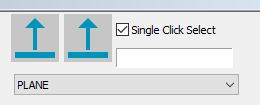
From the Measure toolbar, under Measure Circle, select the Measure Single Point Circle toolbar item.

Measure Single Point Circle icon
Position the probe in the hole and take a single hit. PC-DMIS enables the Finish button.
Click Finish. PC-DMIS creates the feature at the intersection of the workplane and the probe sphere (or at the projection plane if a measured plane is currently active). For more information, see "How It Works" below.
Remember that the calculation is done at the intersection of the probe tip with the workplane or projection plane. If the probe sphere is too high or too low, PC-DMIS generates an error message to indicate that the feature has failed. Also, be aware that measuring holes that are much smaller than the diameter of the probe results in less accuracy in the resulting circle diameter.
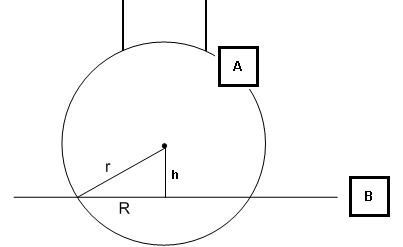
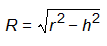
Side view of the workplane and the probe sphere
A - Probe sphere
B - Workplane
h - Height of the sphere center to the workplane
R - Radius of the measured circle
r - Radius of the probe sphere
If the probe sphere is so high that r is less than h, the intersection math fails, and PC-DMIS does not solve the circle. If the sphere center is below the workplane (B), PC-DMIS also does not solve the circle.
Creating a Single-Point Auto Circle
Just like when you create a single-point measured circle, the ball tip must be bigger than the hole you are measuring, and the center of the probe's tip must not cross the reference plane when you create a single-point auto circle. This procedure uses the Auto Feature dialog box, and it requires a reference plane for the surface that contains the hole as a sample feature.
For single-point auto circles to work, make sure that you have cleared these check boxes from the General tab of the Setup Options dialog box (Edit | Preferences | Setup):
Use Measurement Strategy Widget
Use Measurement Strategy Editor
To create a single-point auto circle, follow these steps:
Create a plane feature for the surface that contains the hole.
Open the Auto Feature dialog box for an auto circle (Insert | Feature | Auto | Circle).
Click on a hole on the CAD to define the nominals for the circle.
On the Contact Sample Hits Properties tab, select Sample Feature.
From the Sample Feature list, select the reference plane for the surface that contains the hole.
On the Contact Path Properties tab, set the Hits to 1 and Depth to 0 (zero).
Click Create to create the auto circle feature and then click Close to close the dialog box.
Once you've defined the first single-point auto circle, you can then perform a Shift + click to define more circles on that surface.